Automated posting and commenting on Facebook is a key strategy for saving time, expanding content reach, and maintaining consistent engagement. With MKT Care software, you can easily schedule posts to groups, fanpages, or profiles, and automatically comment to create viral effects and efficient seeding.
This guide will walk you through how to use the auto-posting and commenting features—from basic setup to advanced configurations tailored to specific campaigns.
I.Group Post Automation Guide
The “Group Post” feature allows you to automatically publish posts into Facebook groups that your accounts have already joined or based on a prepared list of group UIDs. This function helps expand your content reach, promote your brand, and directly engage with potential customers, thereby boosting sales and marketing effectiveness.
1.Post to group
1.Step 1: Select the Post Feature
-
Access the main interface of the system.
-
Select the Post function.
-
From the available options, choose Post to Groups.

2.Step 2: Set Up Group Post Configuration
Select Account Category
Choose the account category you will use to post into groups. This can be a group of accounts you’ve already prepared.
Group Post Settings
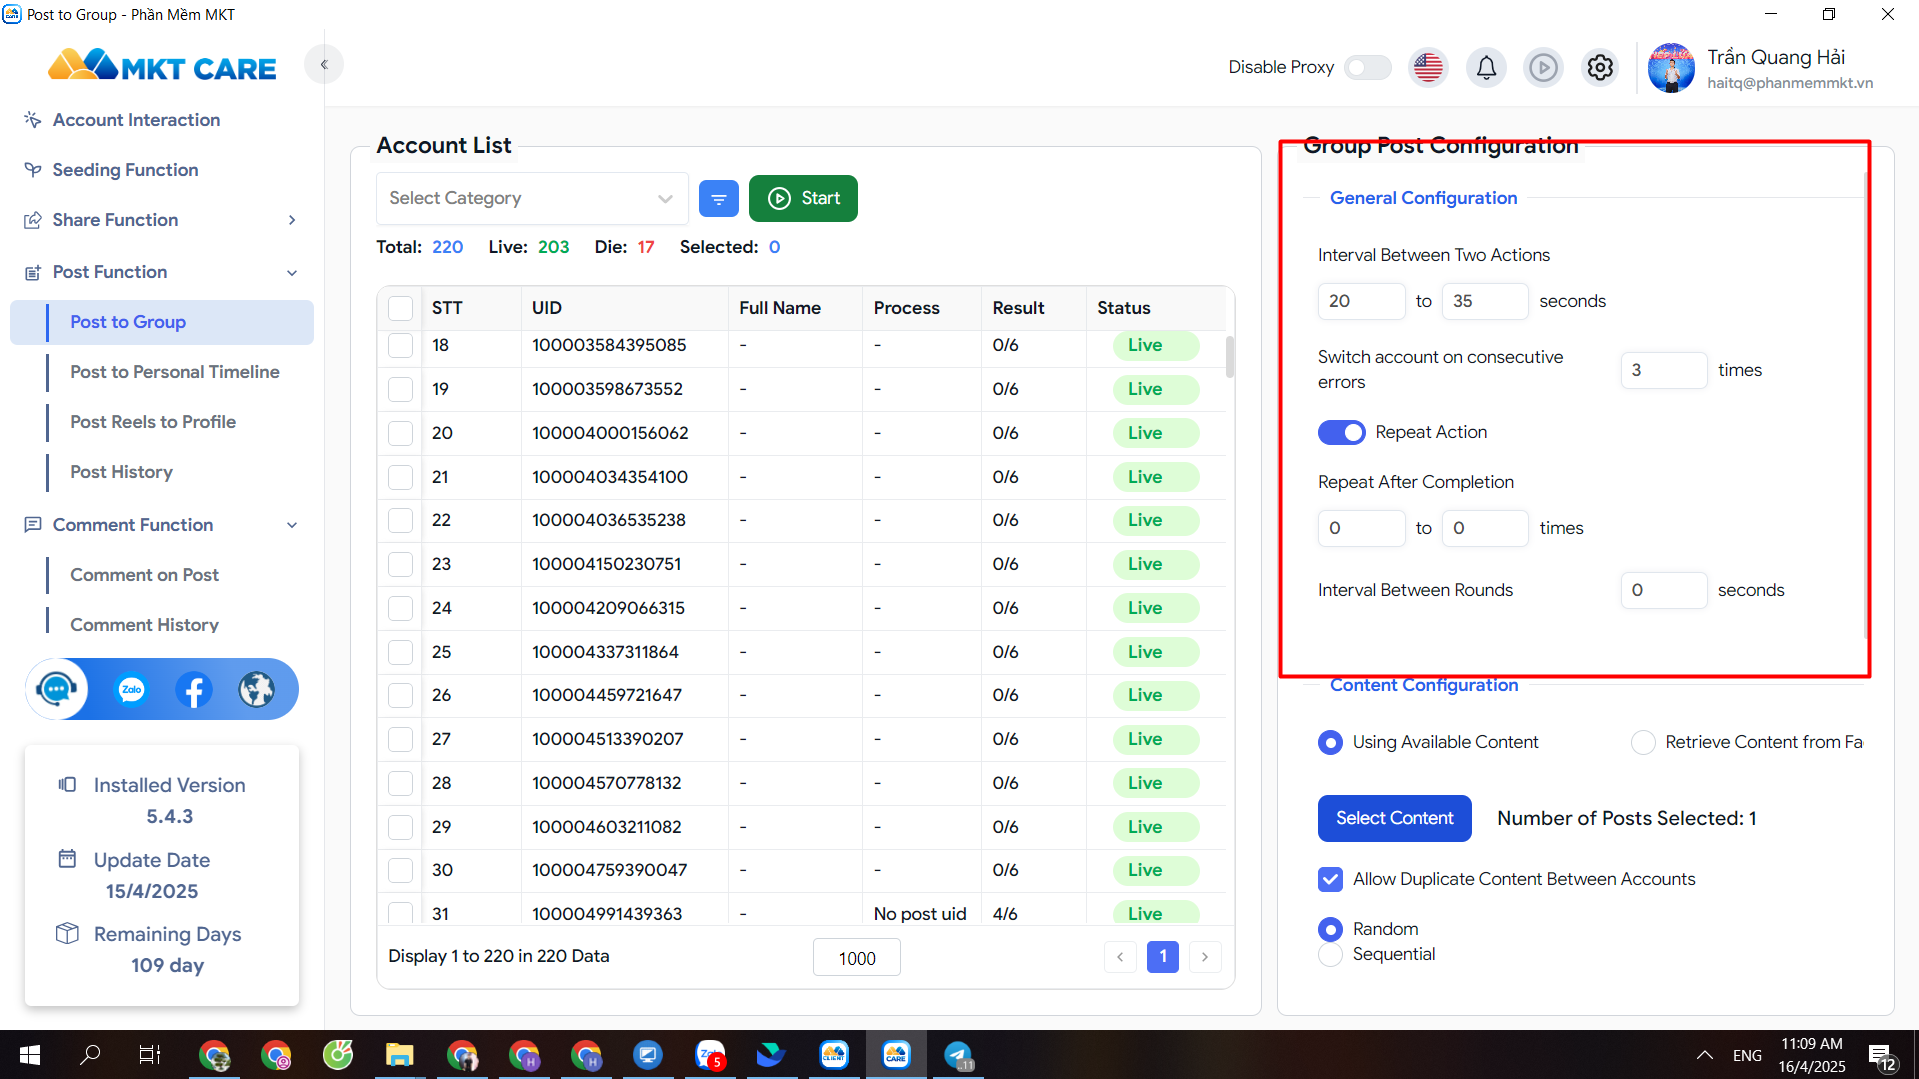
General Configuration:
-
Interval Between Actions: Set the time delay between each post to avoid posting too quickly into multiple groups (e.g., 20 seconds, 30 seconds, etc.).
-
Switch Account on Repeated Errors: Automatically switch to a new account after a set number of consecutive posting errors (default is 3).
-
Repeat Posting: Set the number of repetitions and the delay time between each round of posting (e.g., repeat X times, wait Y–Z seconds between rounds).
Content Configuration:
-
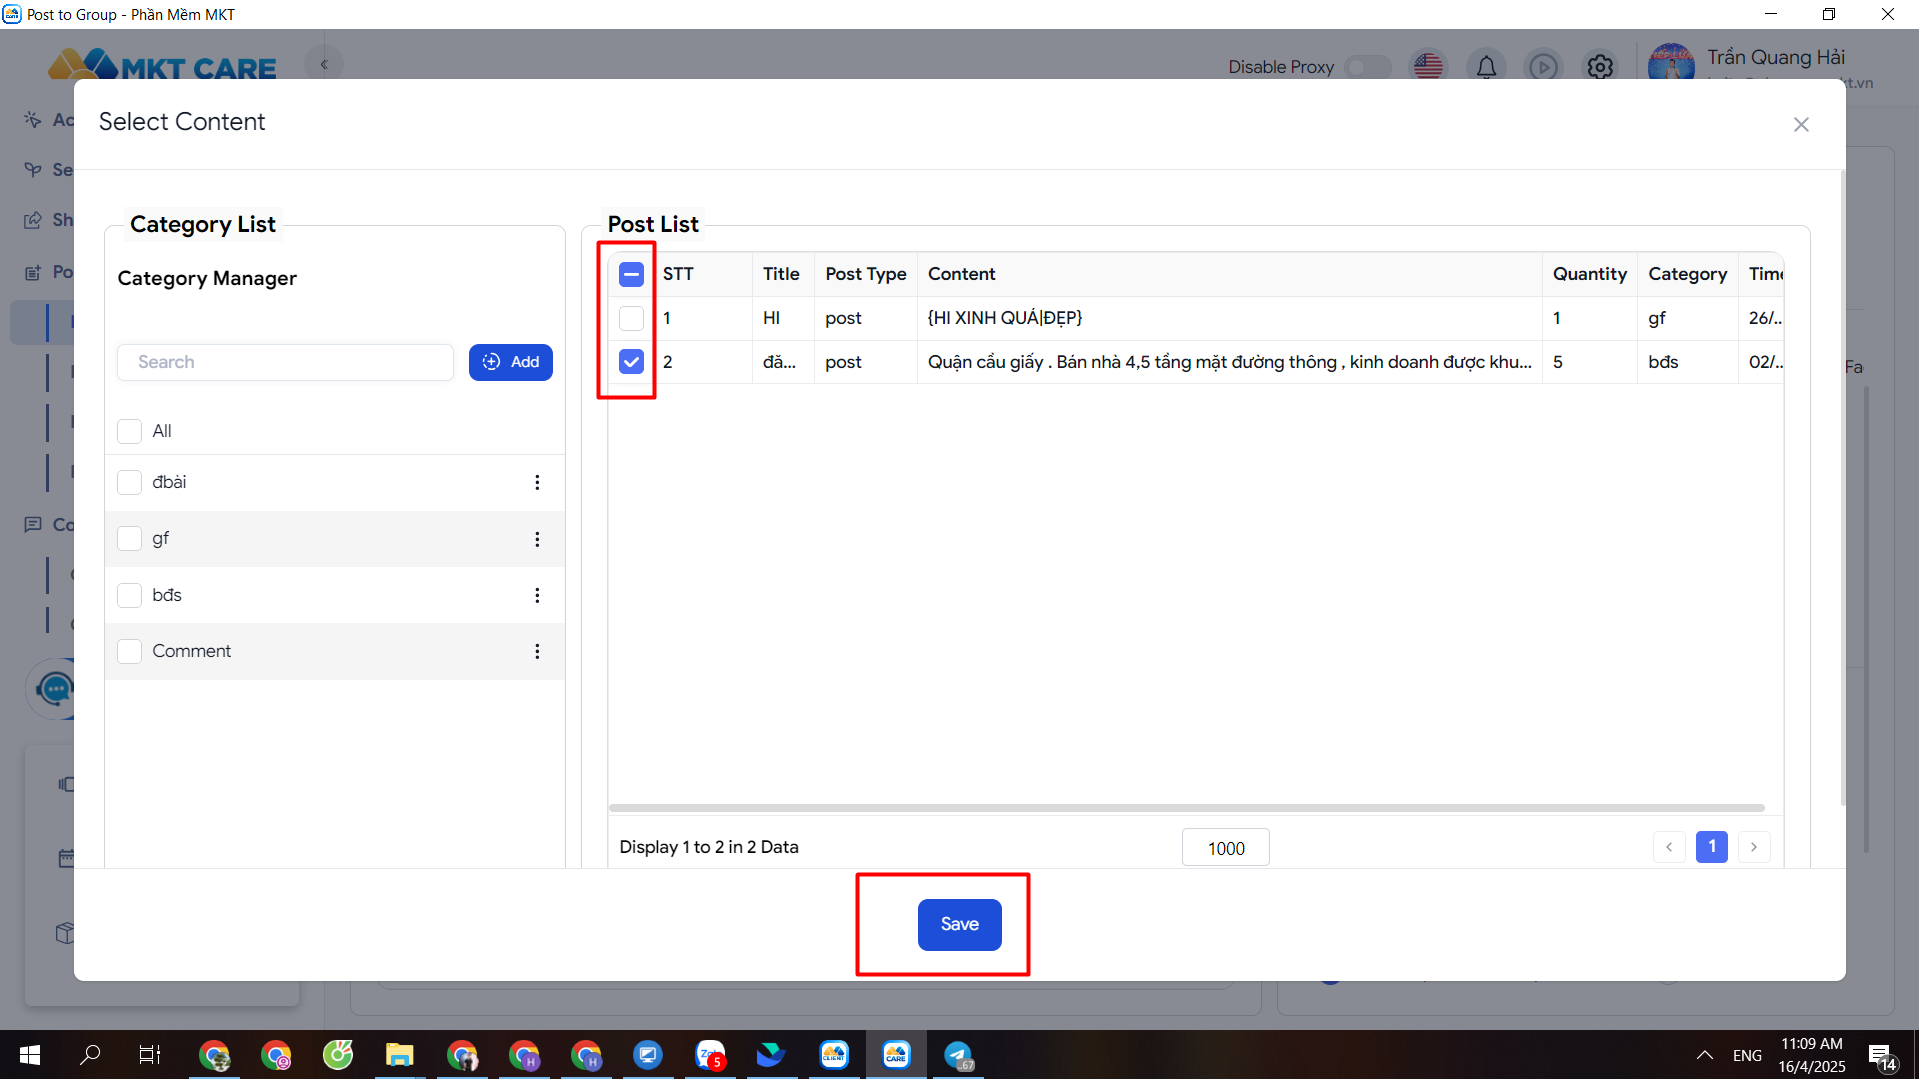
Use Existing Content: Select pre-written content already saved in the system to post into groups.
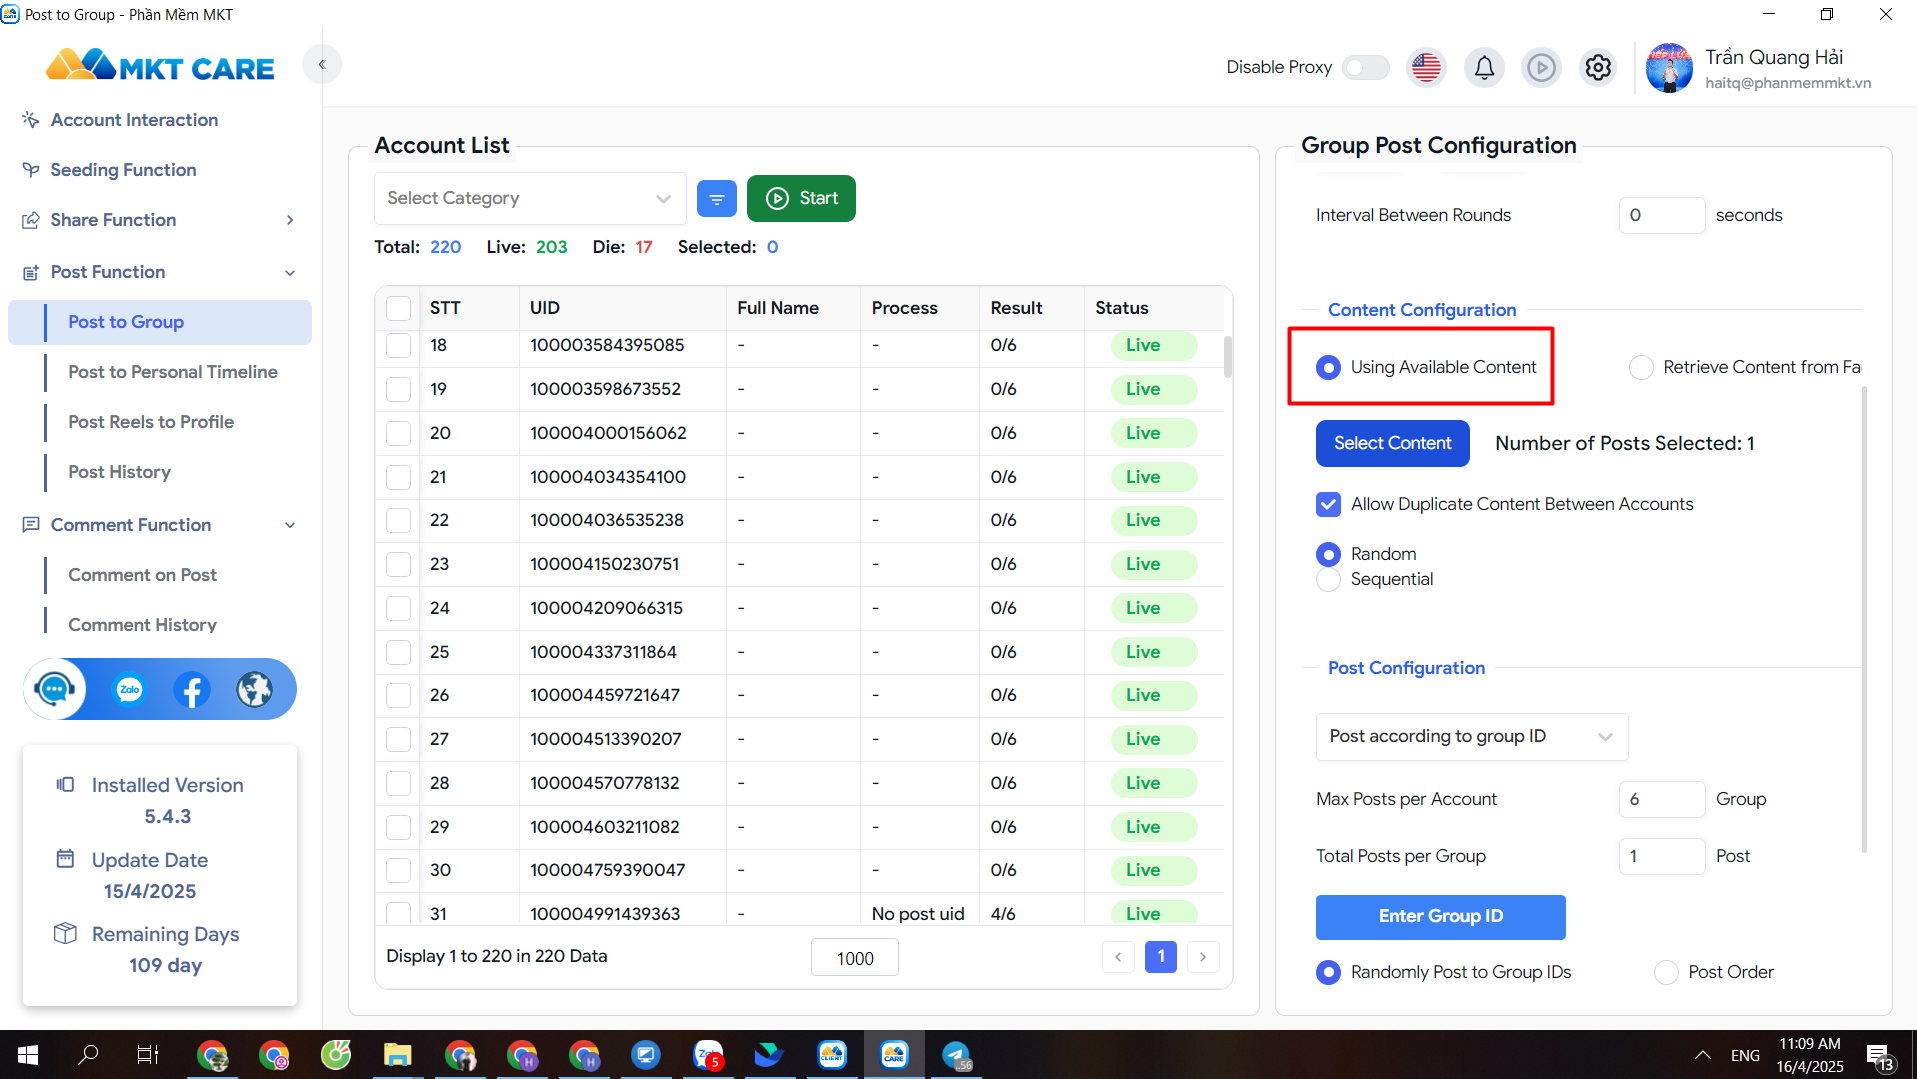
here :
-
Fetch Content from Facebook: Use this option if you want to extract content from an existing Facebook post or page.
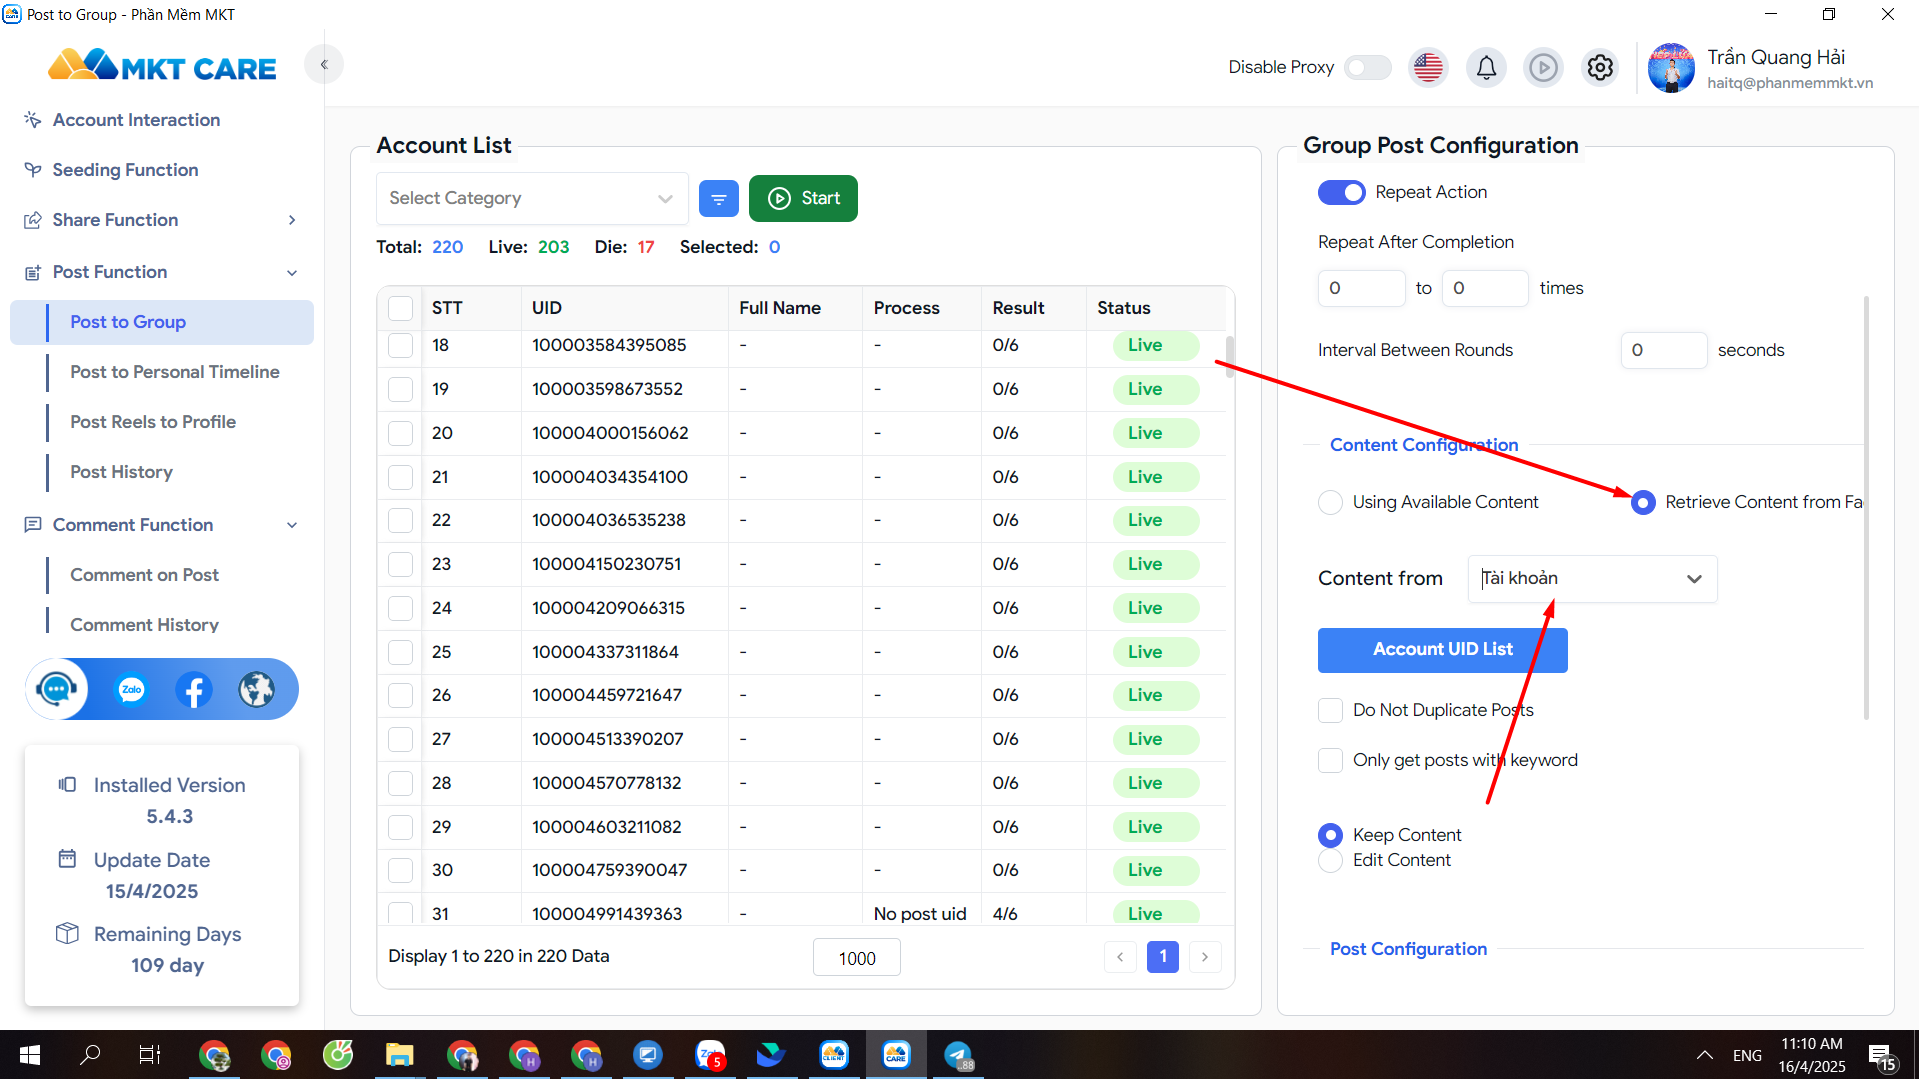
→ Select by Account ID or Page ID, and enter those IDs into the “UID Account/Page List” field.
-
Avoid Duplicate Posts: Prevent accounts from posting the same content.
-
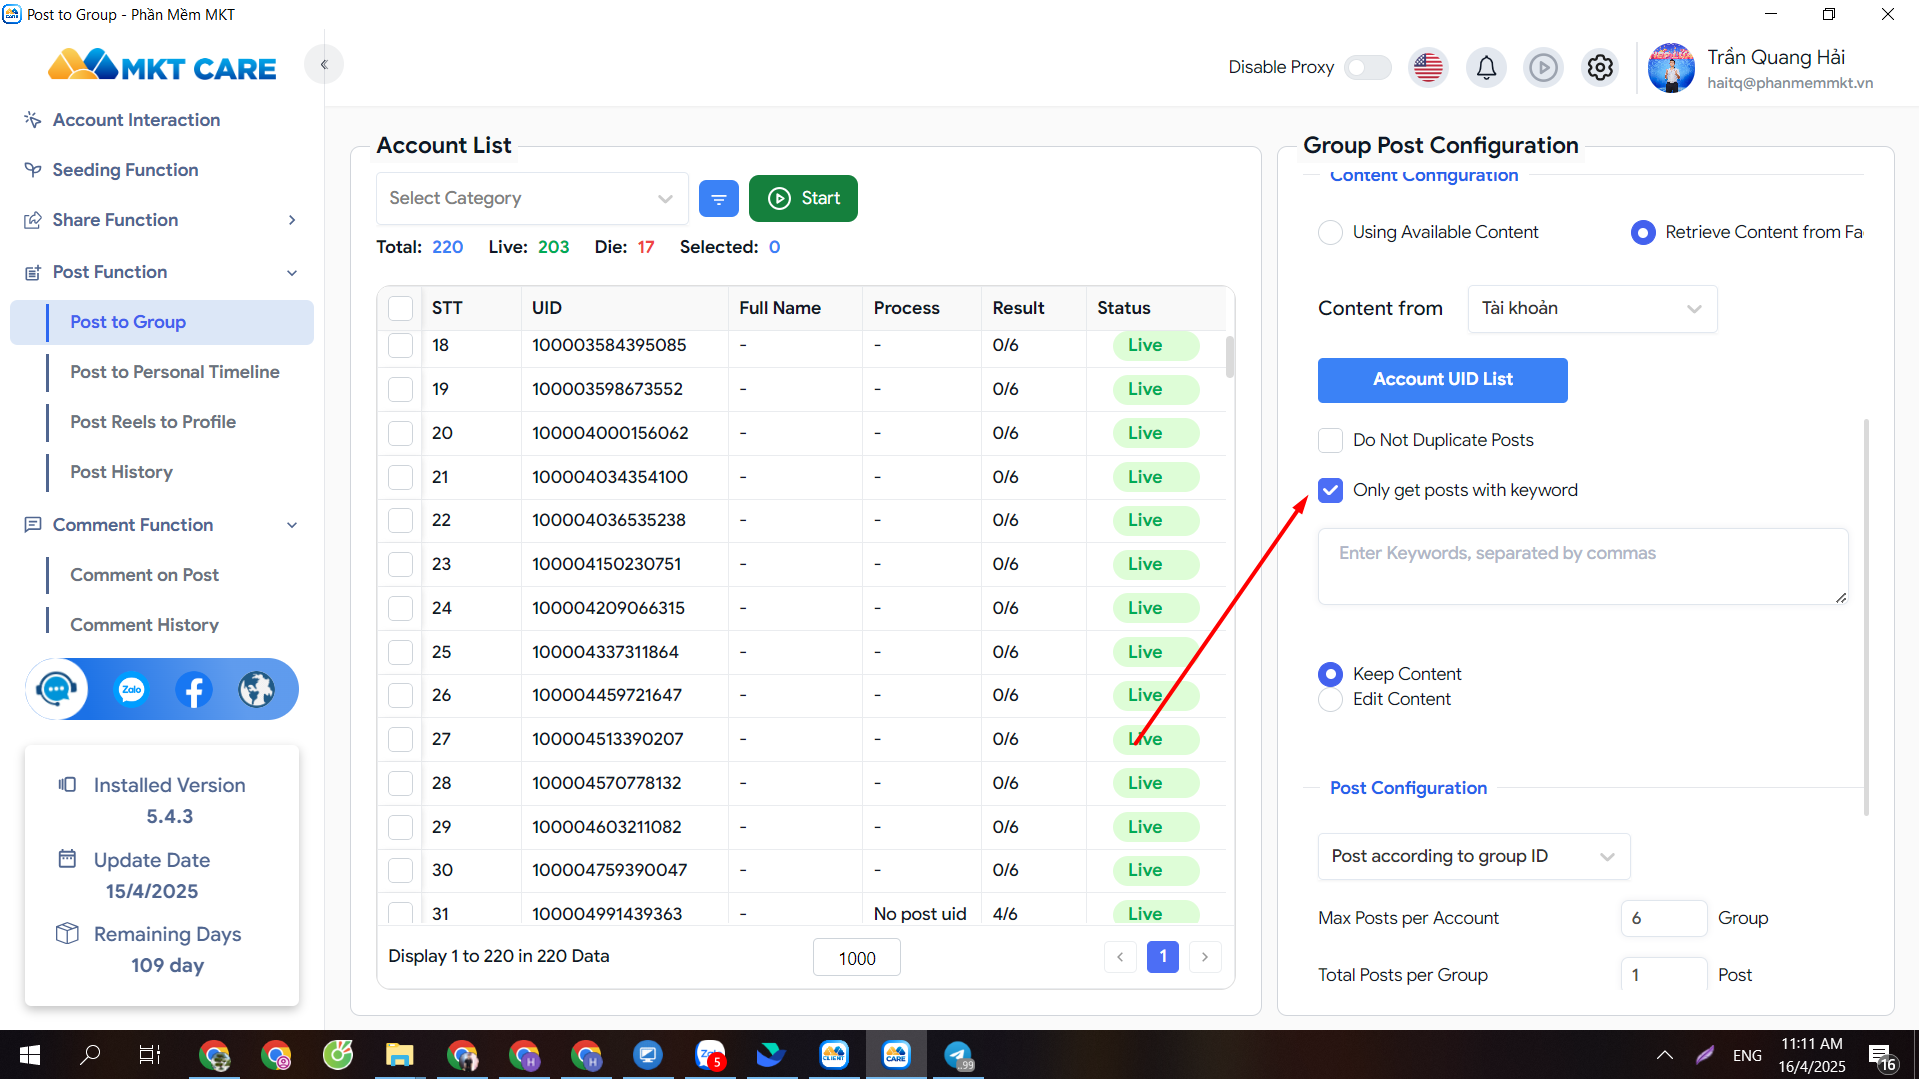
Only Fetch Posts with Keywords: Pull posts that contain specific keywords (separated by commas).
Content Editing Options:
-
Keep Original Content
-
Edit Content
-
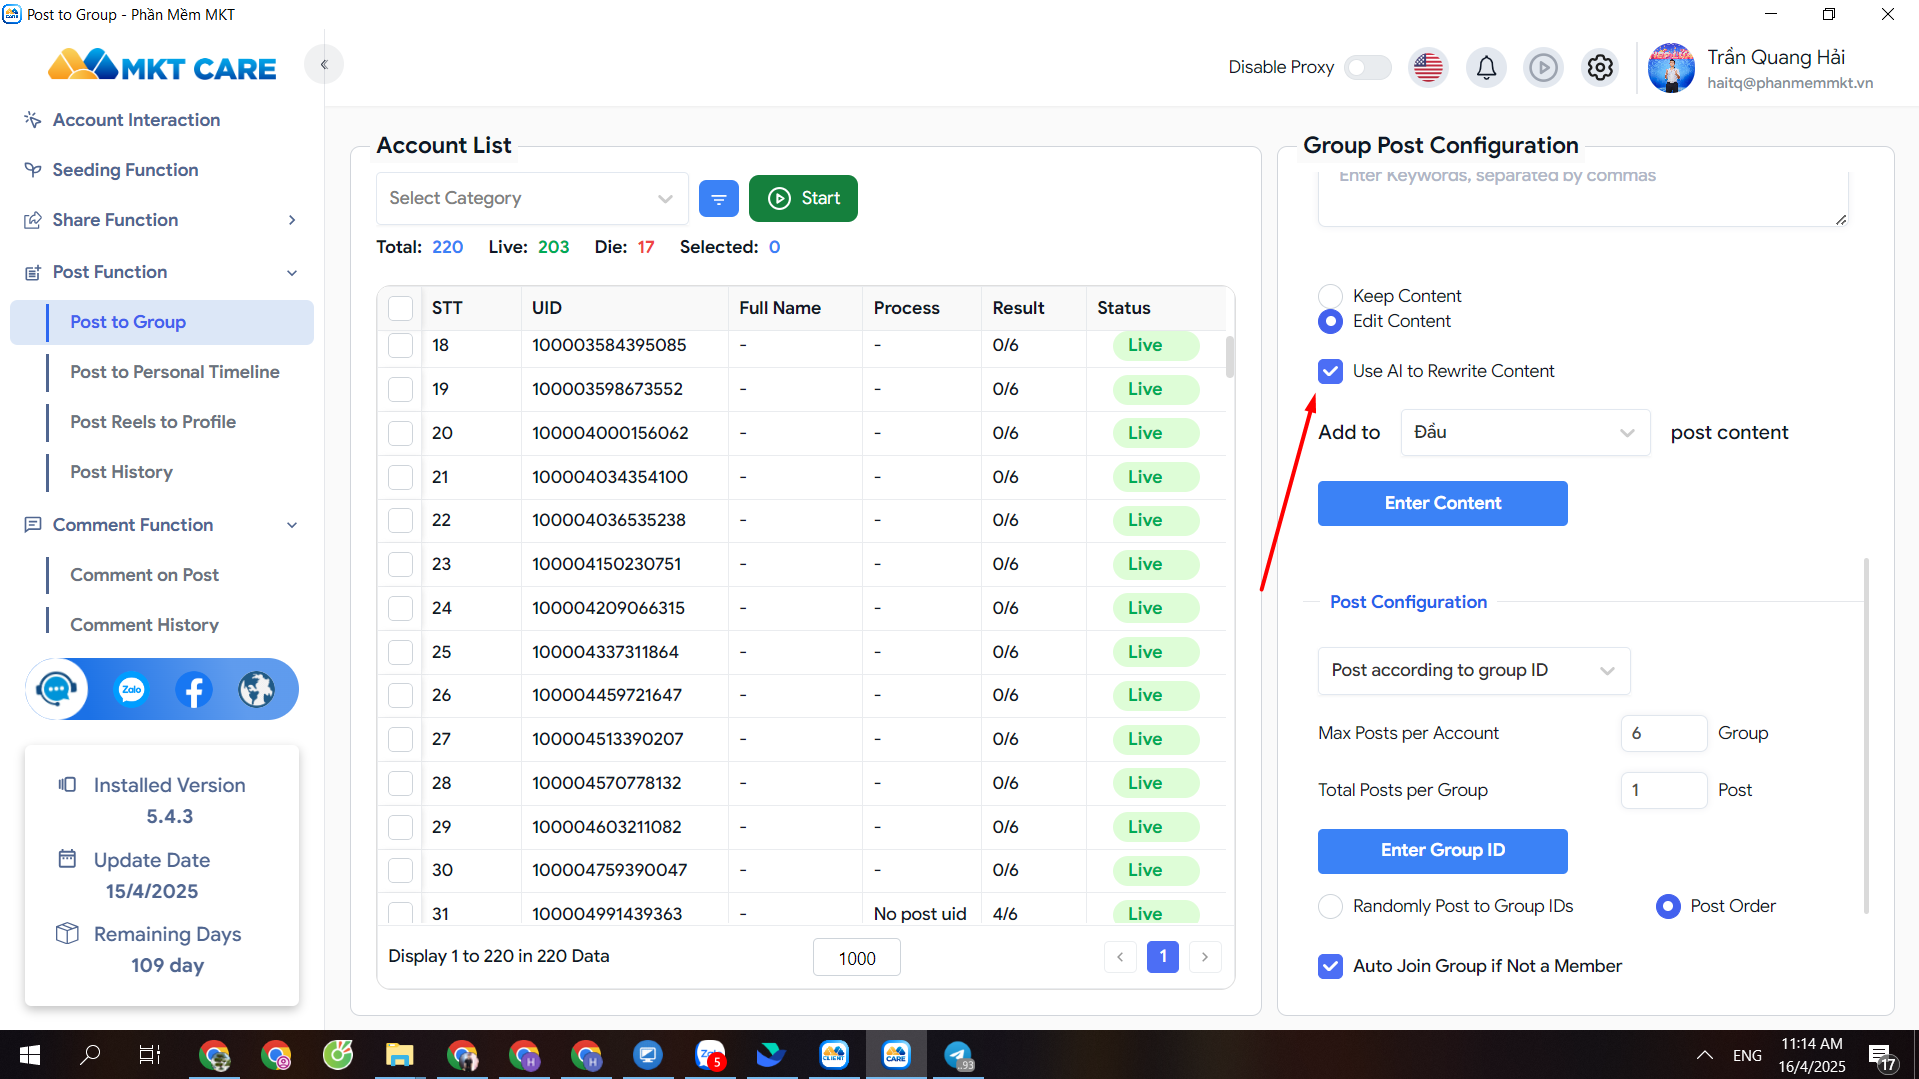
Use AI to Rewrite Content (requires AI API configured in system settings)
-
Add Text to the Beginning/End of Post: Input the content you want to prepend or append to each post.
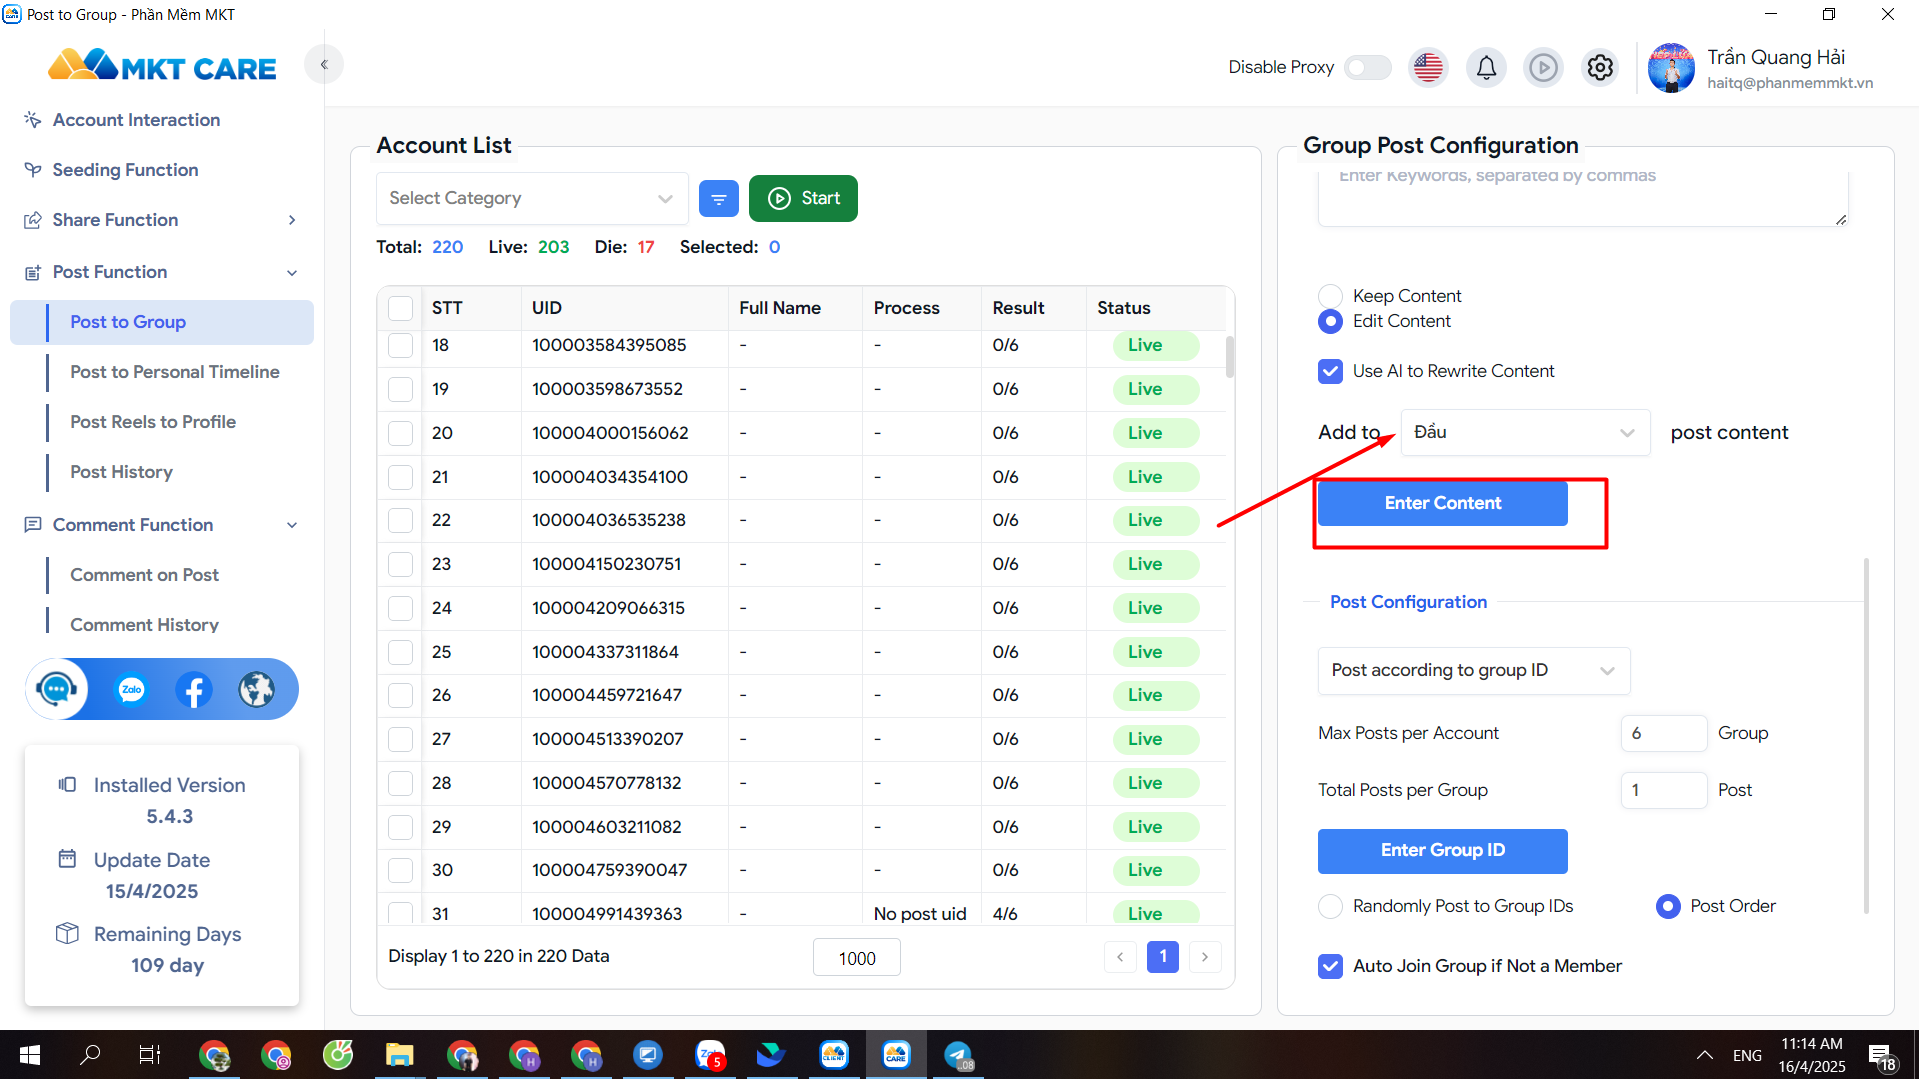
Post Target Group Configuration:
-
Choose Groups to Post To
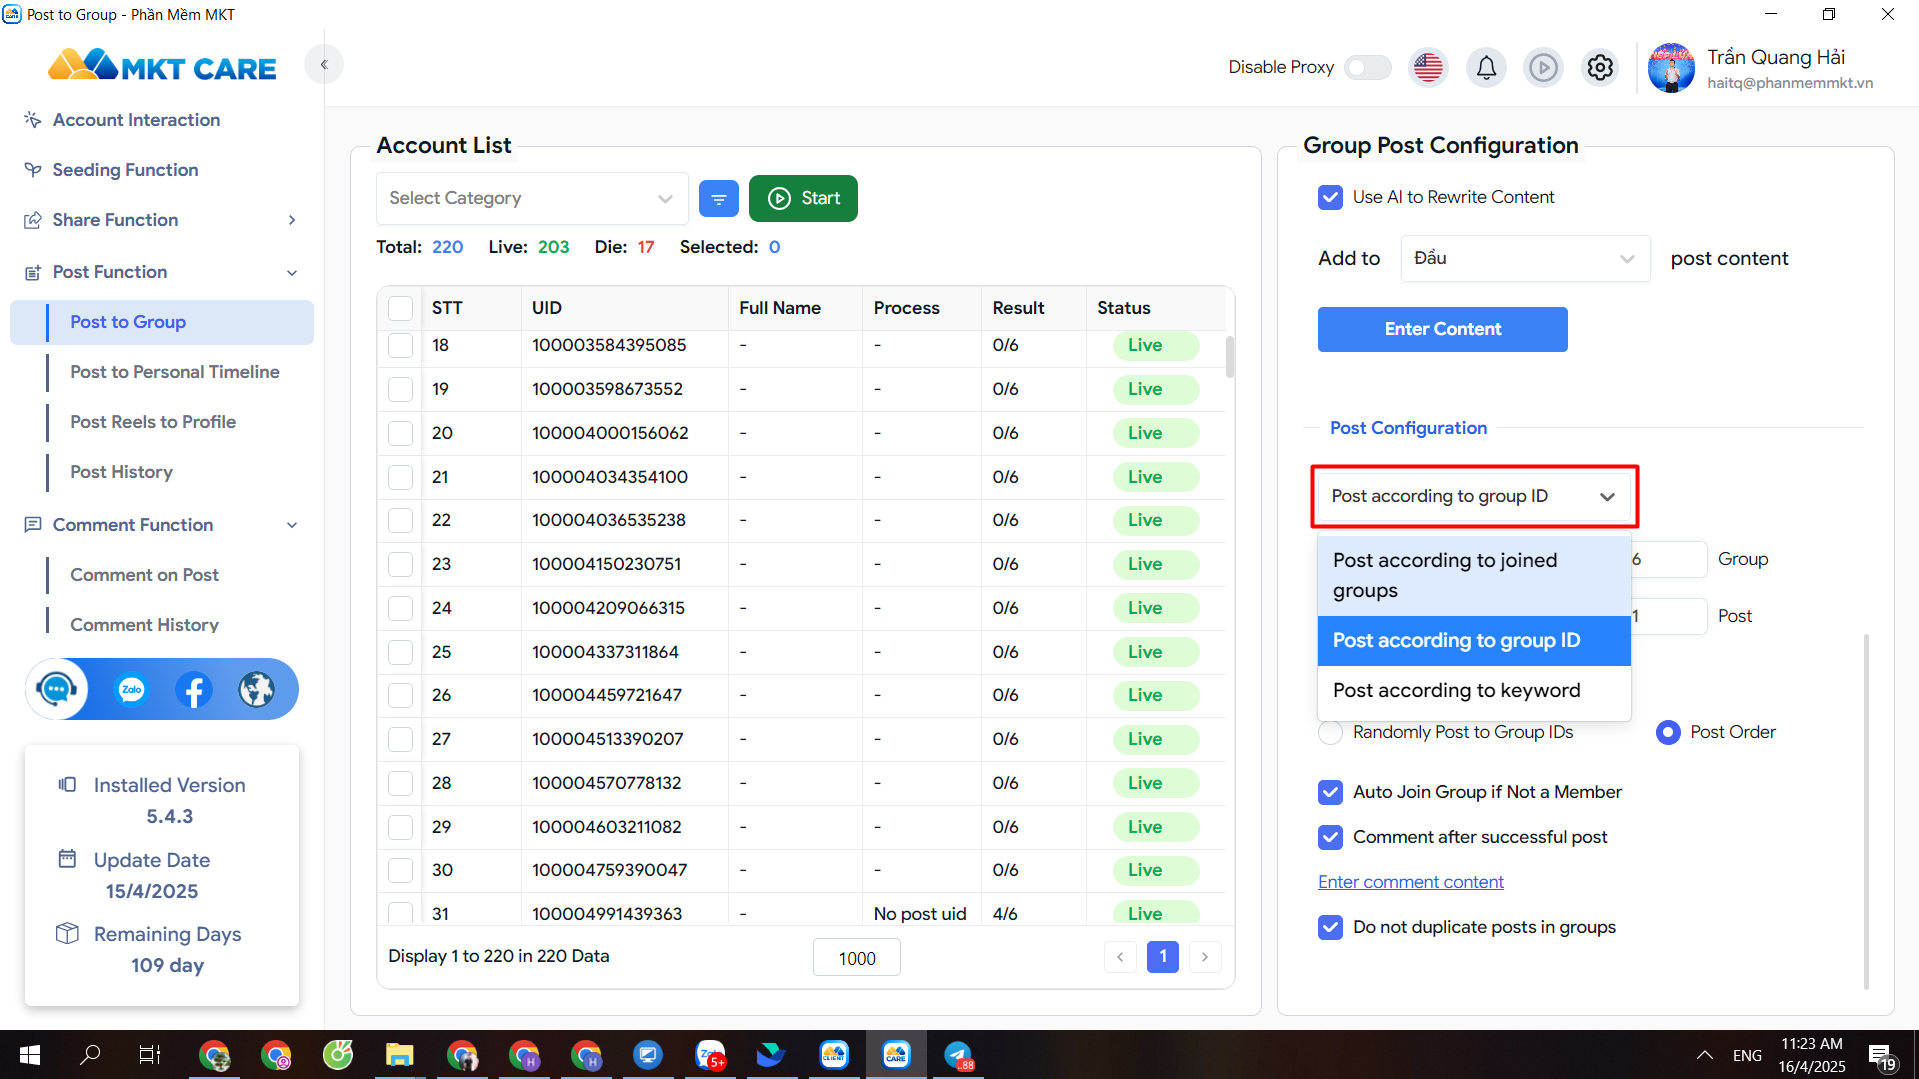
Options include:
-
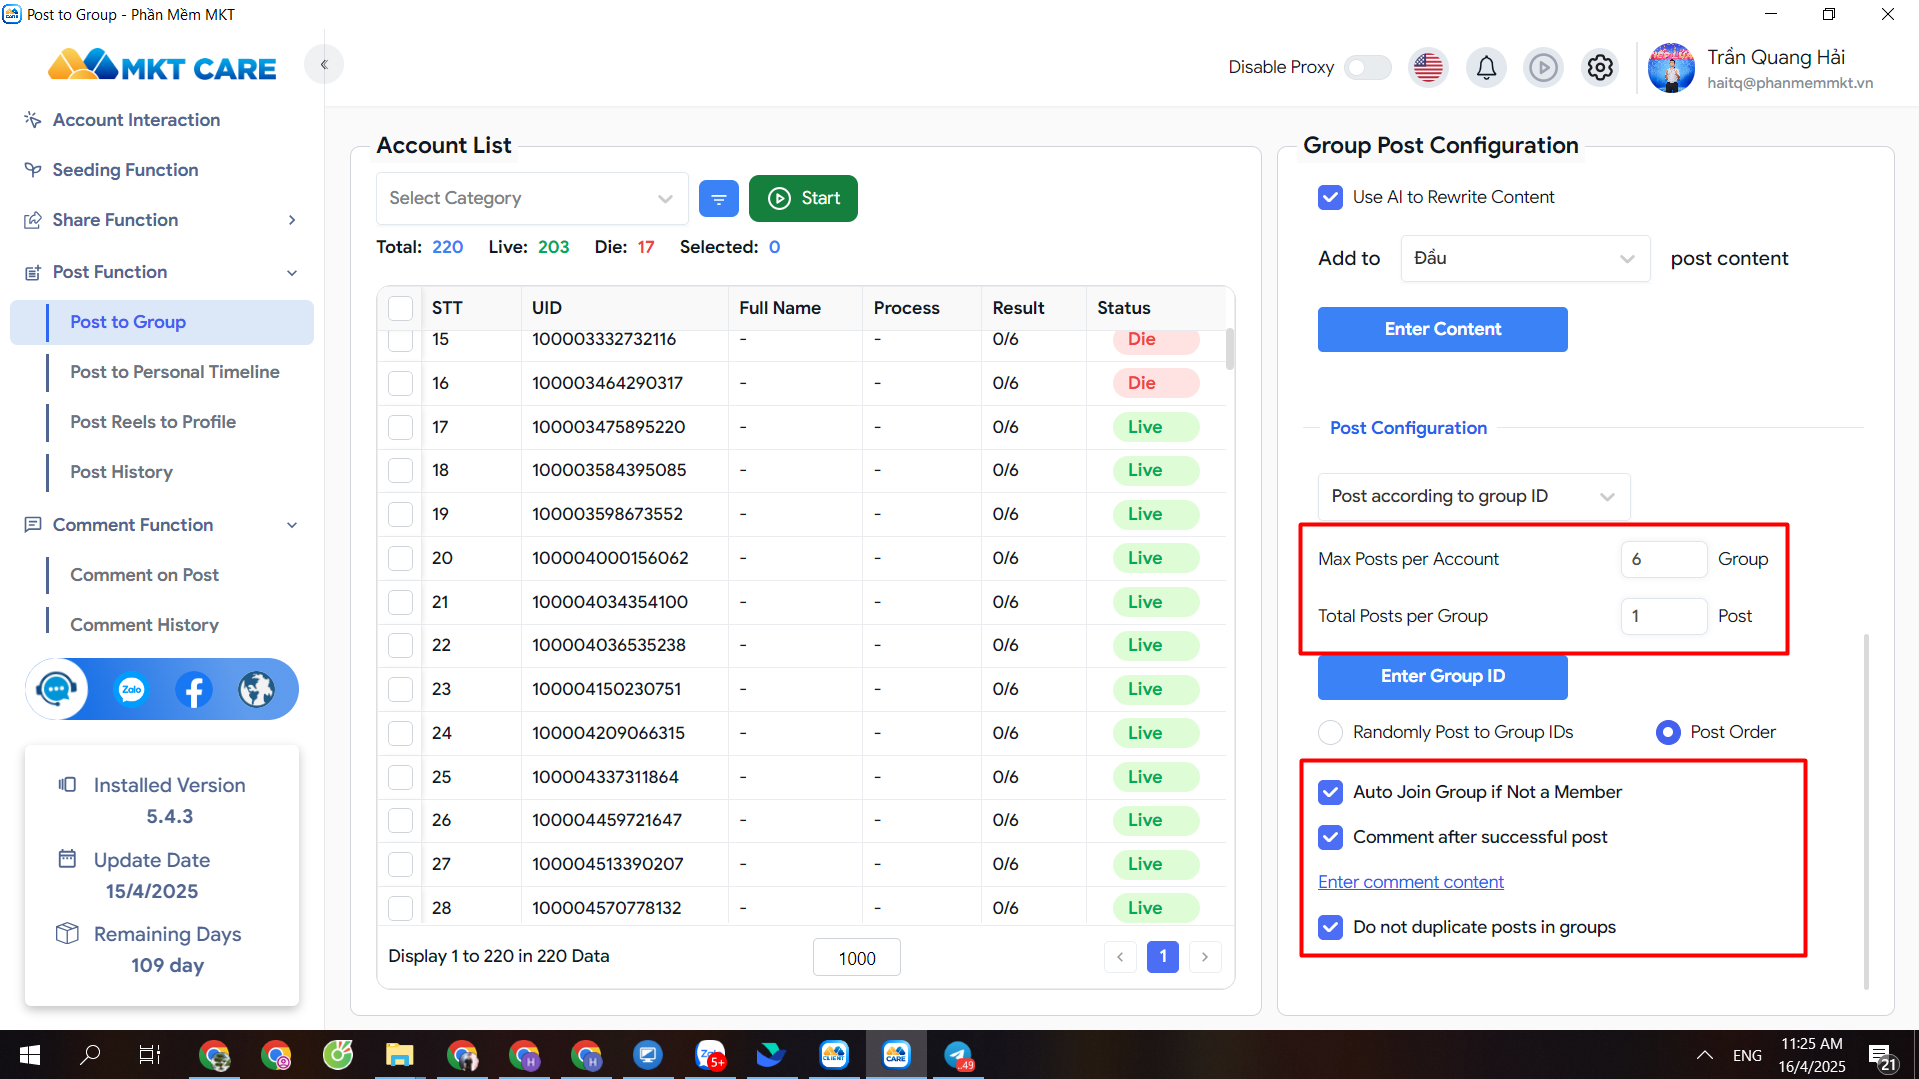
Post to Joined Groups: The account will post into groups it has already joined.
-
Post by Group IDs: Post into groups listed by specific IDs.
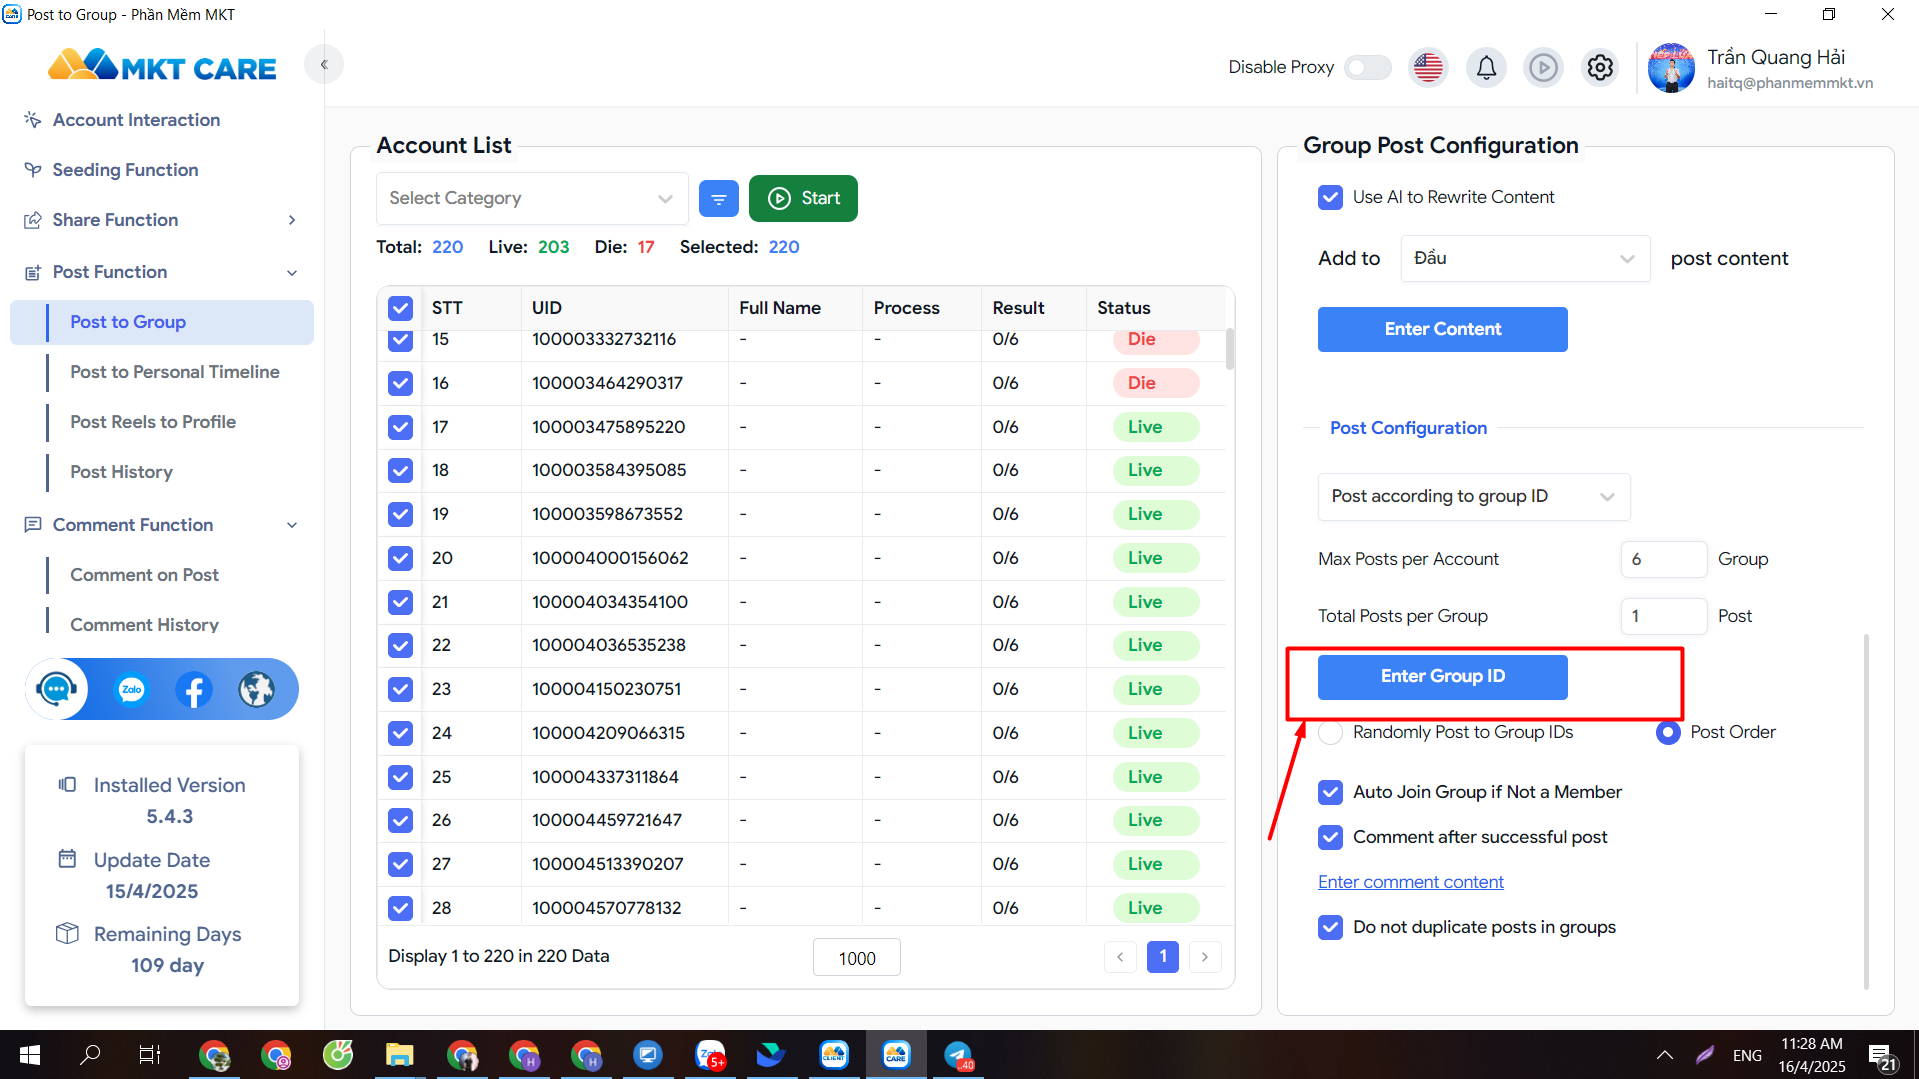
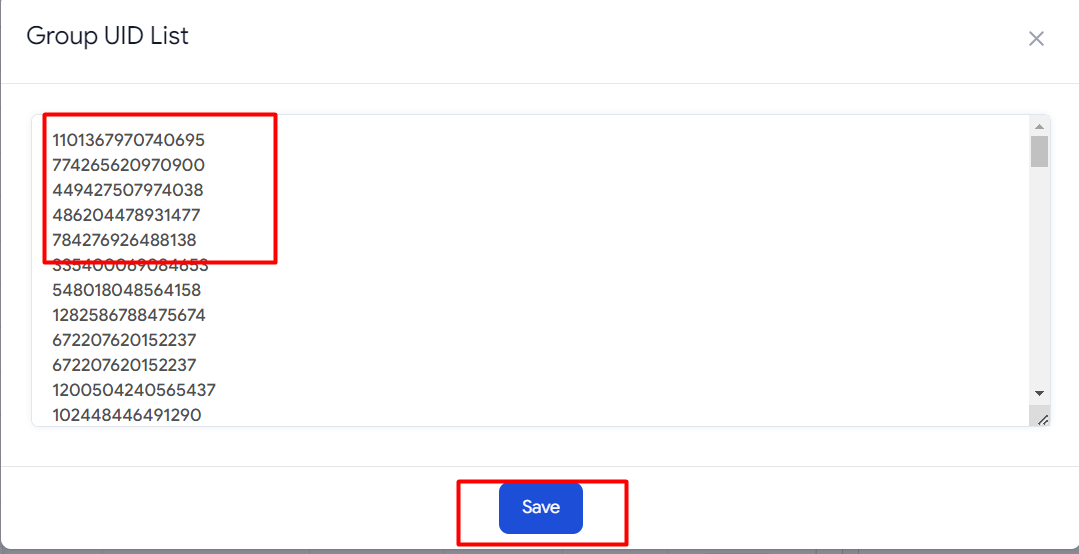
-
Random Group ID Selection: Randomly choose from the provided group IDs.
-
Sequential Group Posting: Post into group IDs in a defined order.
-
Search Groups by Keyword: Find groups by keywords and post into them.
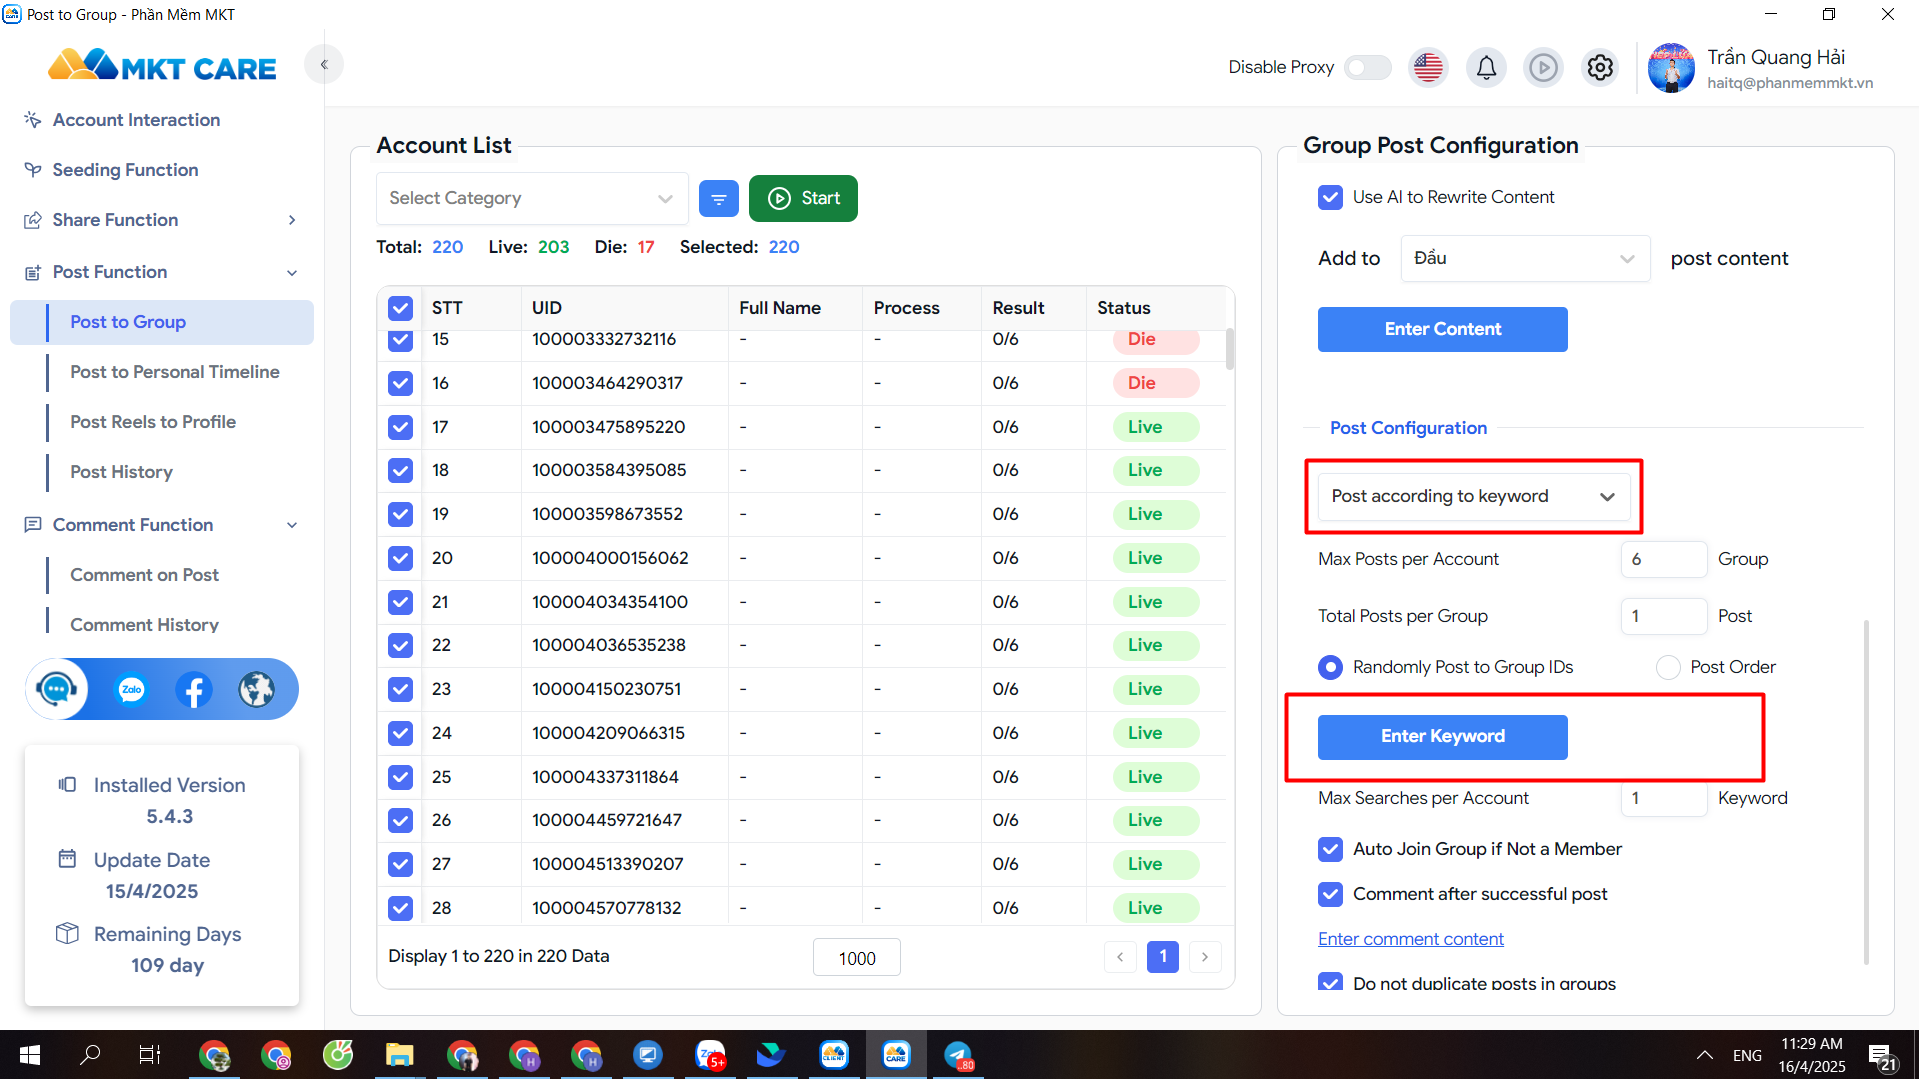
→ Enter the keywords to search for groups.
→ Set the number of groups to find for each keyword.
-
Max Groups per Account: Set a limit on how many groups each account can post to.
-
Max Posts per Group: Set a limit on how many posts an account can make to a single group.
-
Auto Join Group if Not Yet Joined: Enable this option to allow the account to join a group before posting.
-
Comment After Posting: Enable if you want the account to comment on its own post after publishing.
-
Avoid Duplicate Groups: Ensure that different accounts do not post into the same group.
🔹 Step 3: Start the Program
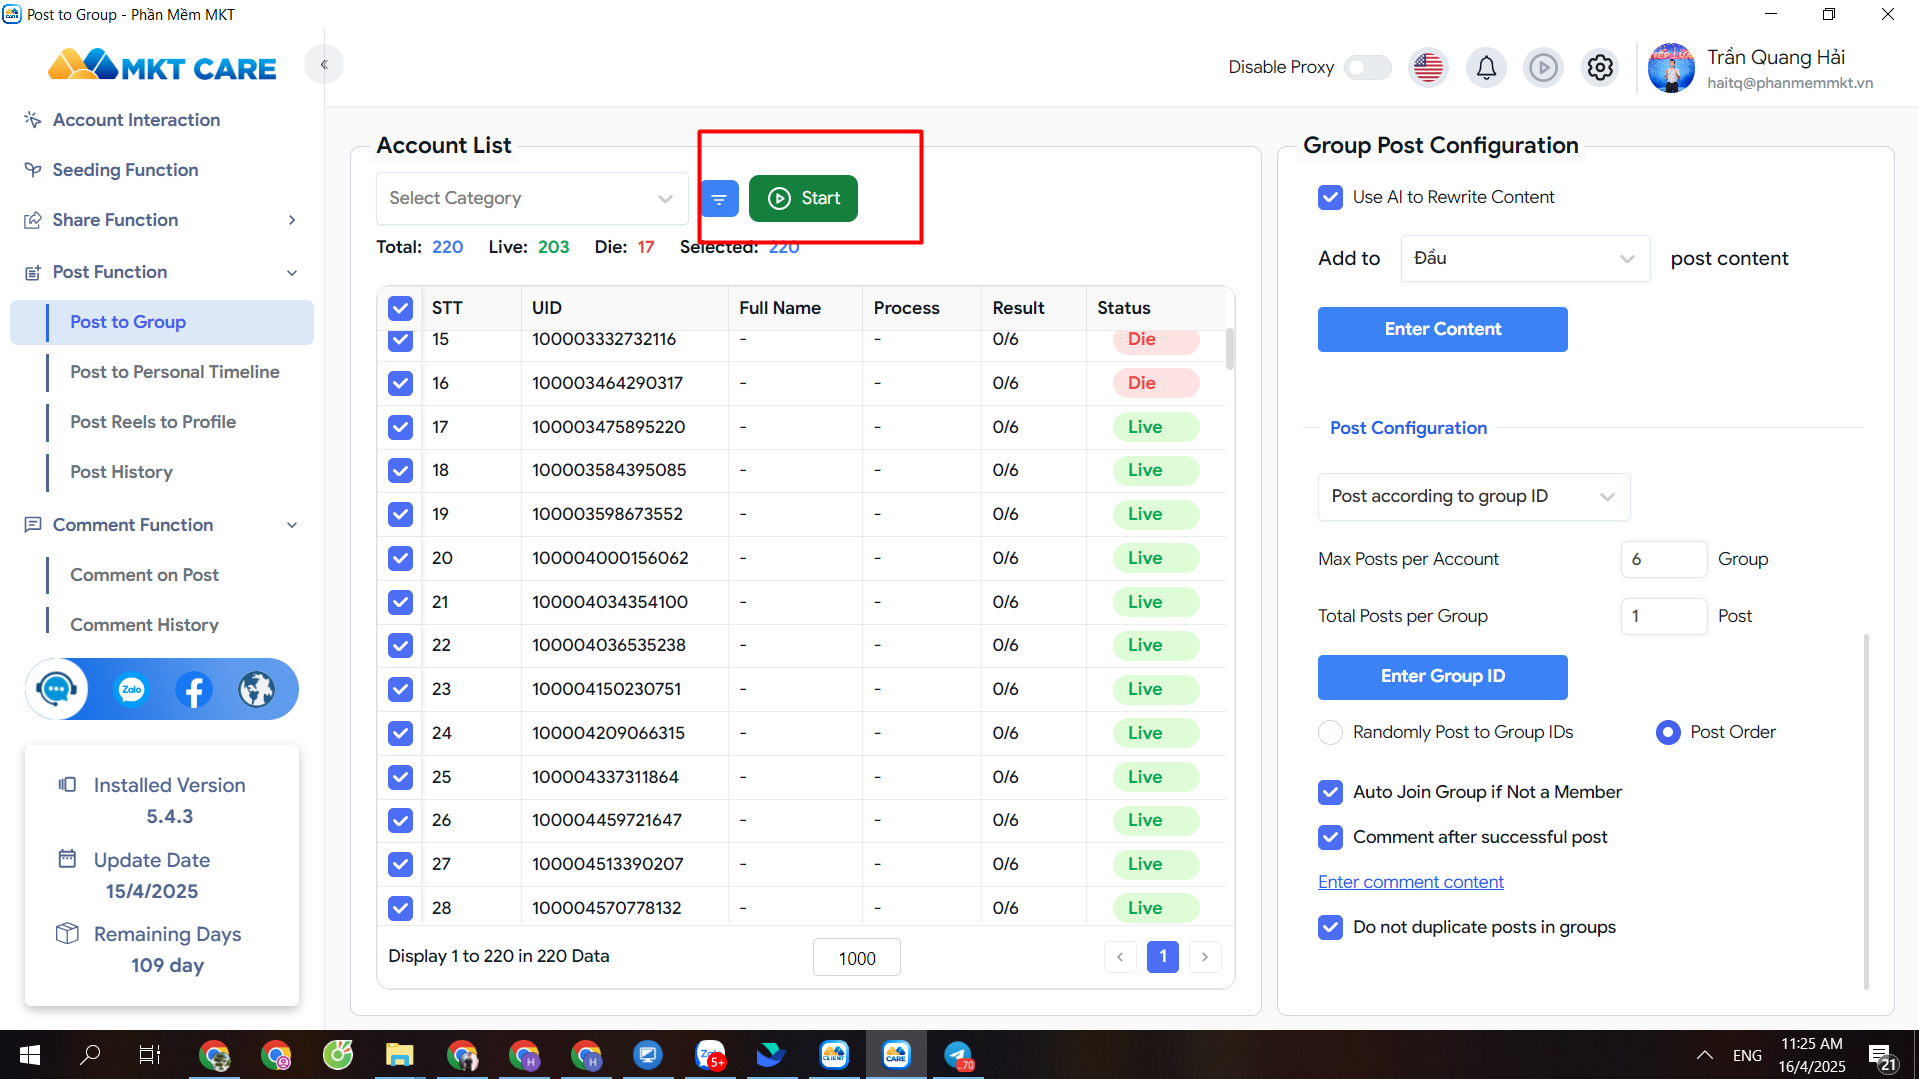
After completing all configuration settings, review the input parameters one final time.
Click Start to begin the automated group posting process.
The system will carry out the group posting actions according to the configurations you have set.
2: Personal Post Automation
The “Personal Post” feature allows you to automatically publish content to the personal Facebook timeline of your accounts. This helps maintain a consistent social media presence, share important content, increase engagement with friends and followers, and enhance personal or business branding.
🔹 Execution Steps:
Step 1: Select the Post Feature
-
Access the main interface of the system.
-
Click on the Post feature.
-
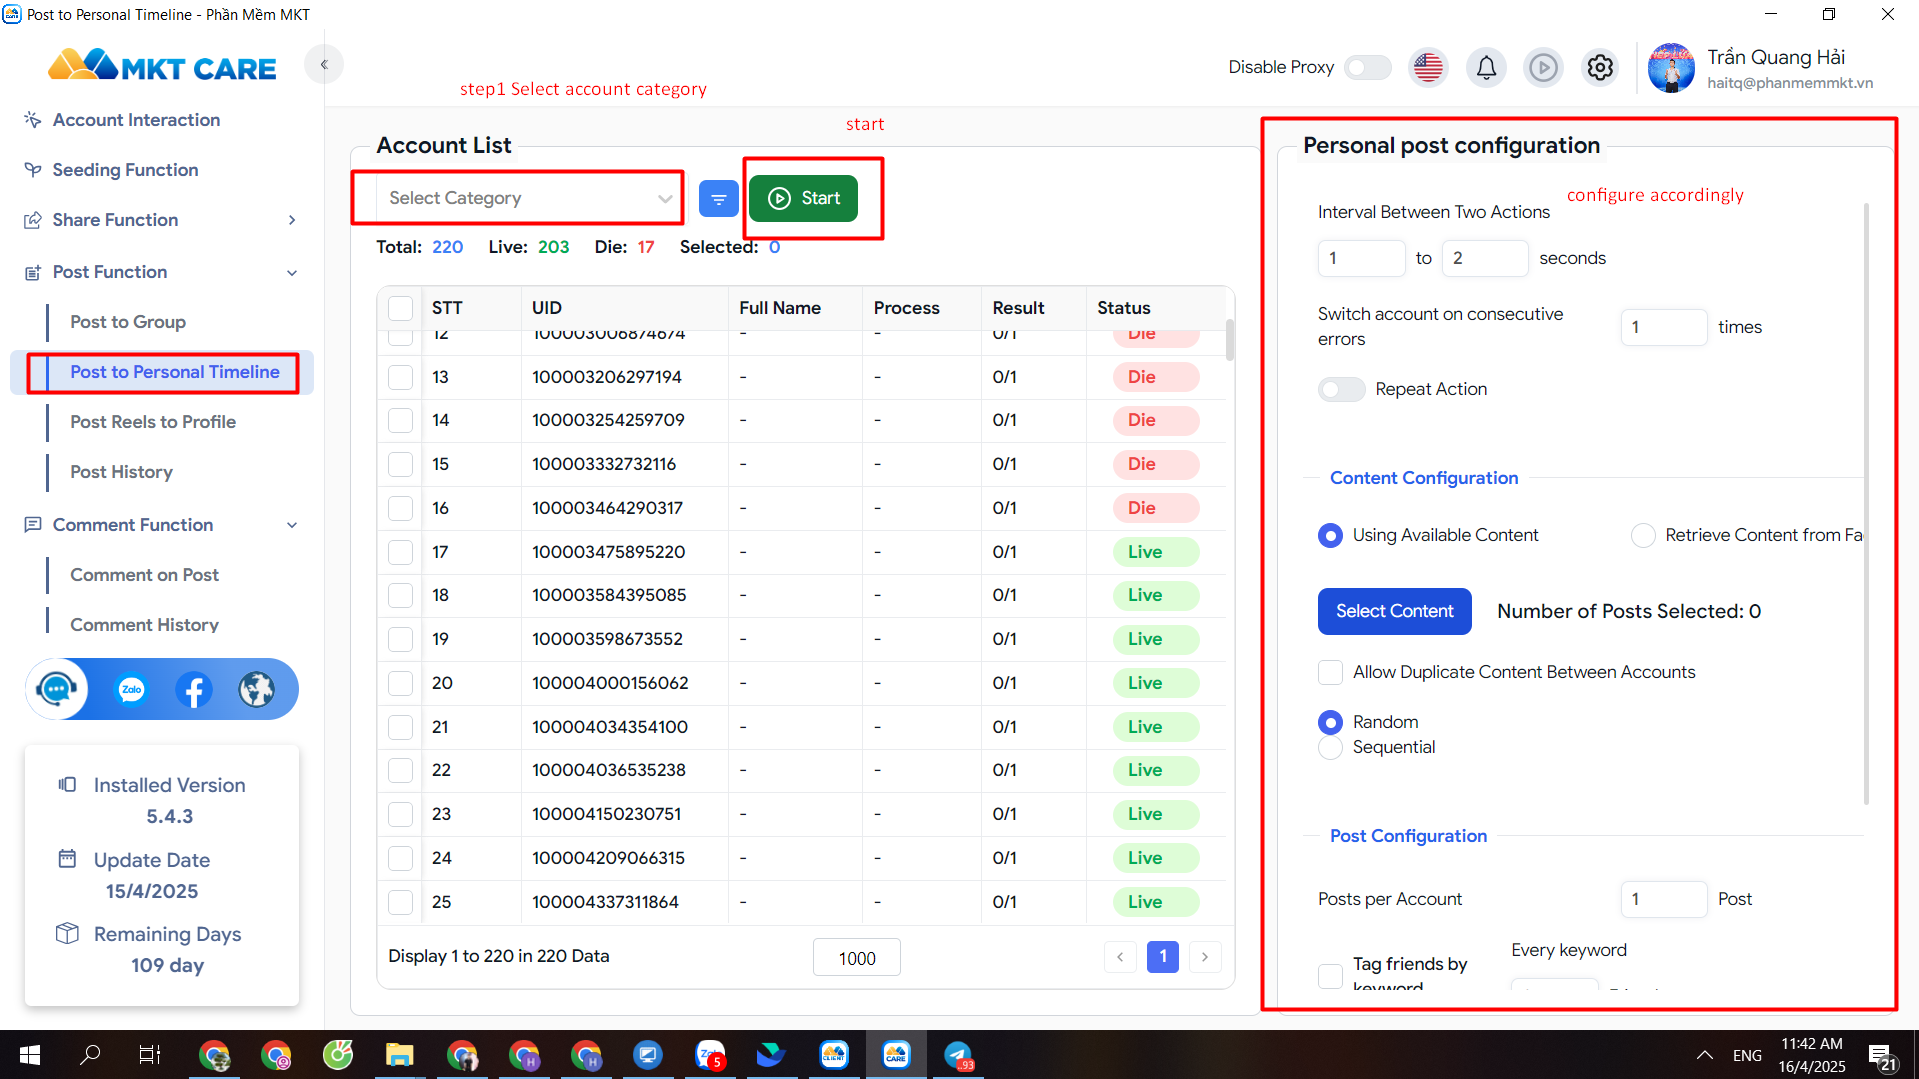
From the available options, select Post to Personal Timeline.
Step 2: Set Up Configuration for Posting
Select Account Category:
Choose the group of accounts that you will use to post. This can be a list of pre-prepared accounts.
Post Configuration:
General Settings:
-
Post Interval: Adjust the time between each post (e.g., 30 to 50 seconds) to avoid posting too quickly.
-
Total Posts per Account: Set the number of posts each account will publish in one session (e.g., 5 posts, 10 posts, etc.).
-
Switch Account on Error: If an account encounters an error while posting, the system will automatically switch to the next account to continue the process.
Content Settings:
-
Use Existing Content: Select pre-written content stored in the system to post.
-
Fetch Content from Facebook: Choose this option to retrieve content from existing Facebook posts.
-
Comment Order: Configure the order in which comments will be made on the post after publishing. This helps manage how interactions appear.
Post Settings:
-
Comment After Successful Post: Enable this option to allow the system to automatically leave a comment after successfully posting. You can configure preset comments or use random comments from a prepared list.
🔹 Step 3: Launch the Program
After completing all configurations, review the settings one more time to ensure accuracy.
Click Start to begin the automatic personal posting process.
The system will then proceed to publish posts according to the settings you have configured.
II.Post Commenting Guide
The “Post Commenting” feature allows you to automatically leave comments on posts within Facebook Groups or based on specific Group/Post IDs. This tool is extremely useful for increasing engagement, enhancing the credibility of posts, and supporting effective marketing campaigns.
🔹 Step 1: Select the Commenting Feature
-
Access the system’s main interface.
-
Click on the Commenting feature.
-
From the available options, select Comment on Posts.
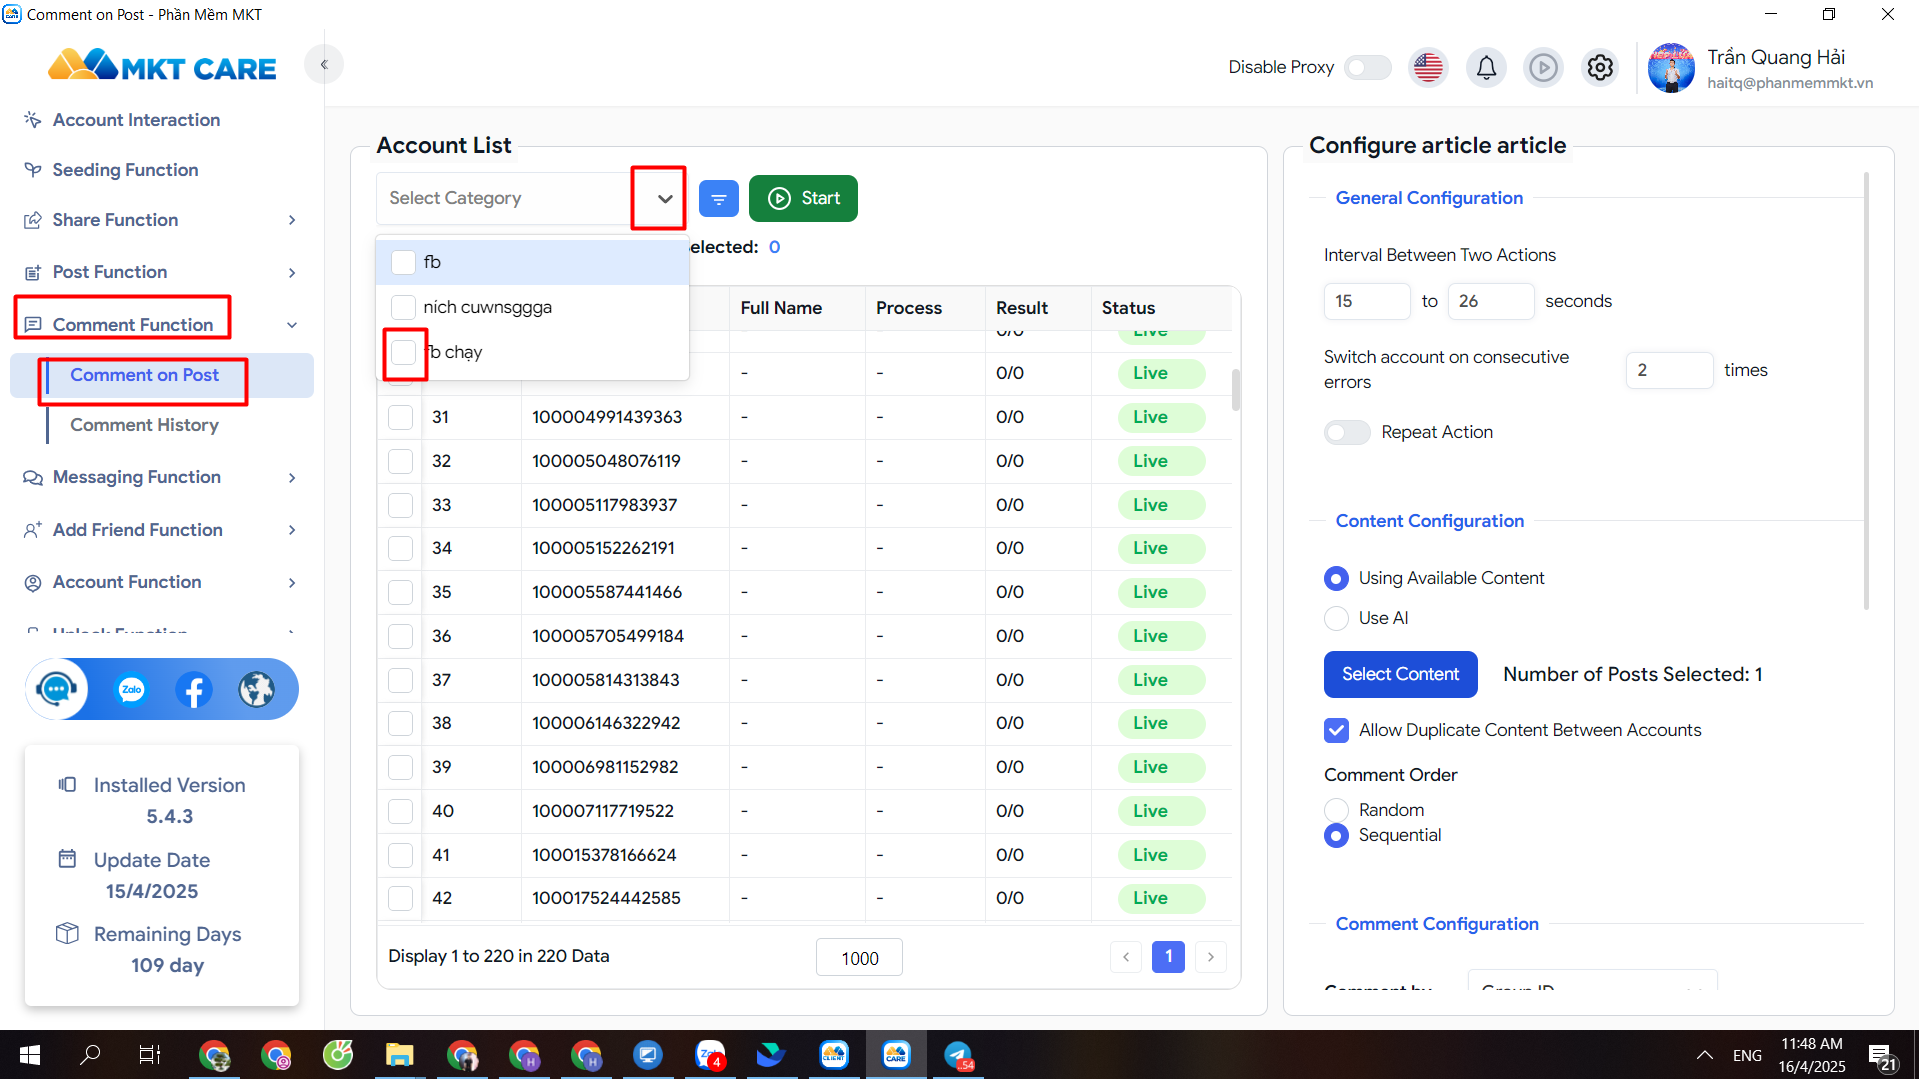
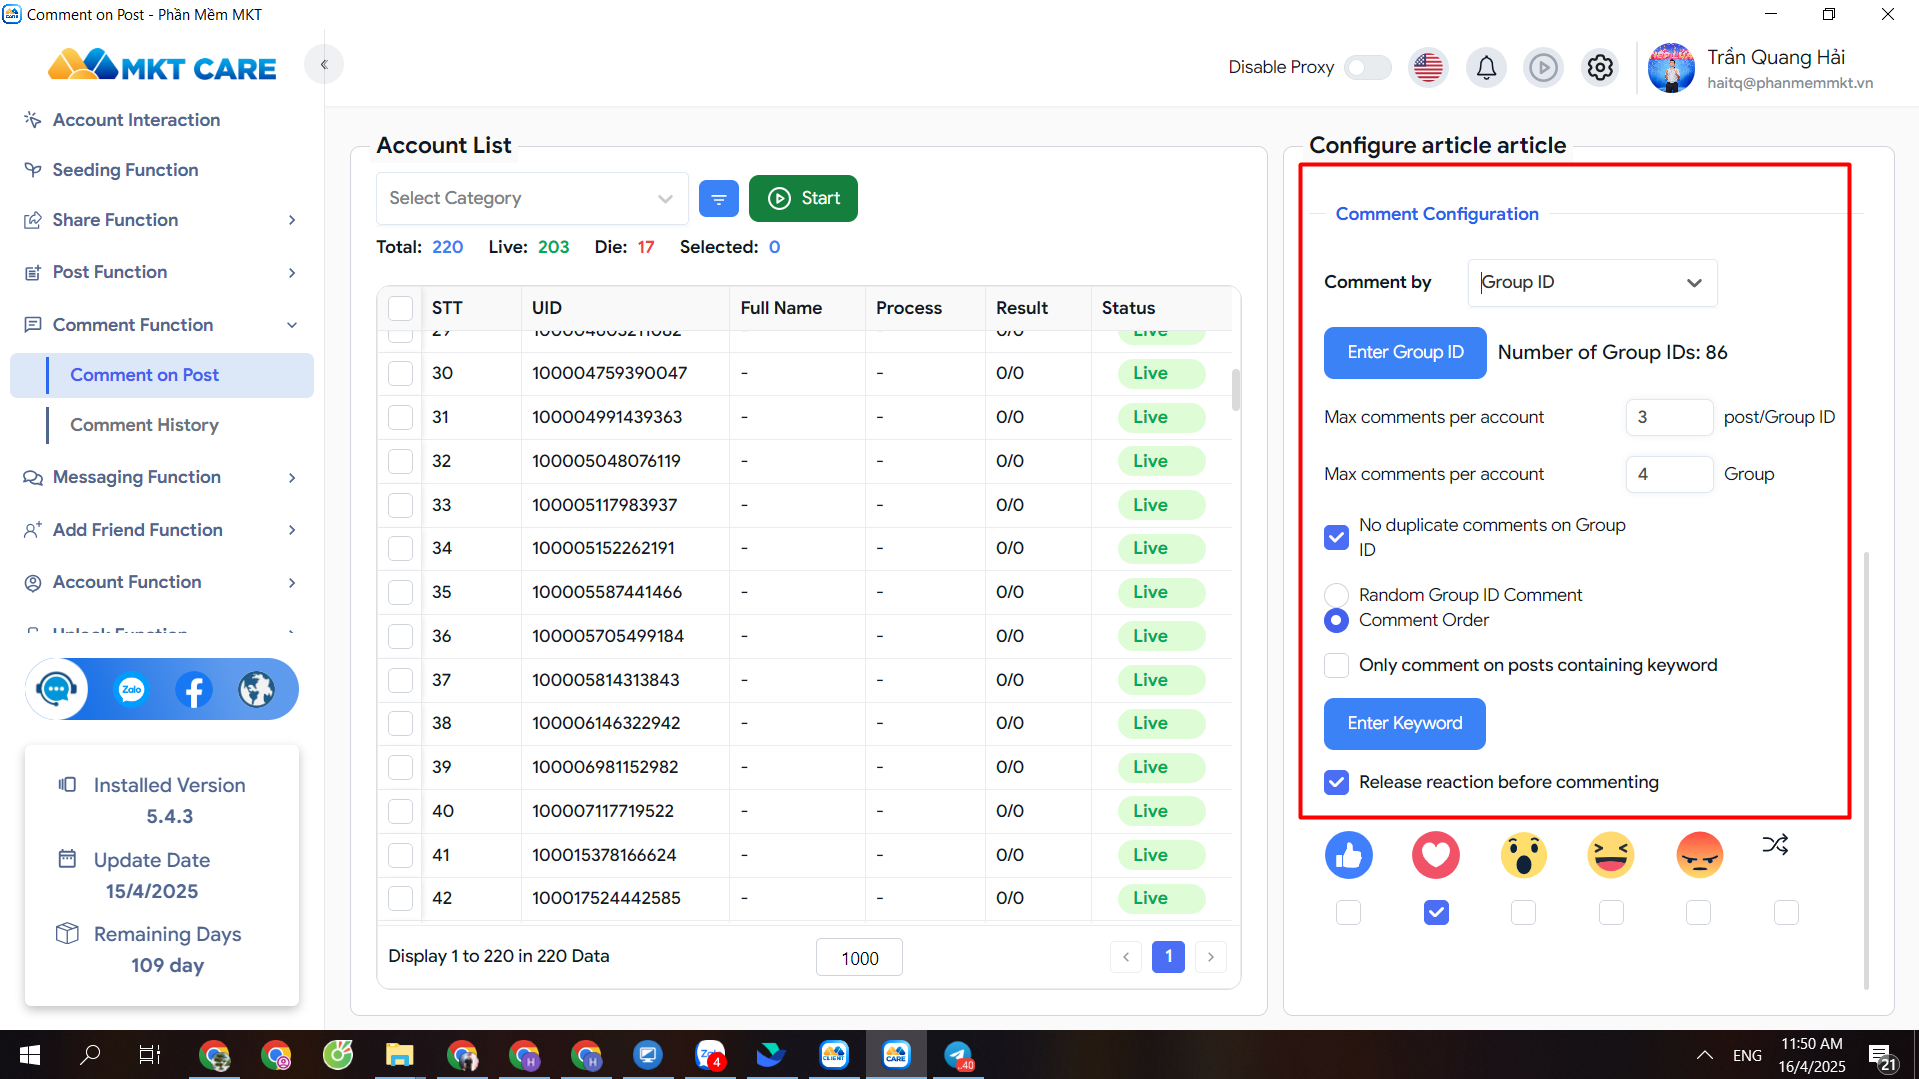
🔹 Step 2: Configure Commenting Settings
Select Account Category:
Choose the account group you want to use for commenting. These should be accounts you’ve already prepared.
General Settings:
-
Interval Between Comments: Set the delay time between comments (e.g., 5 seconds, 10 seconds, or any other desired value).
-
Switch Account on Error: If an account encounters an error while commenting, the system will automatically switch to the next account.
-
Repeat After Completion: Configure the system to repeat the commenting process once a full cycle is completed.
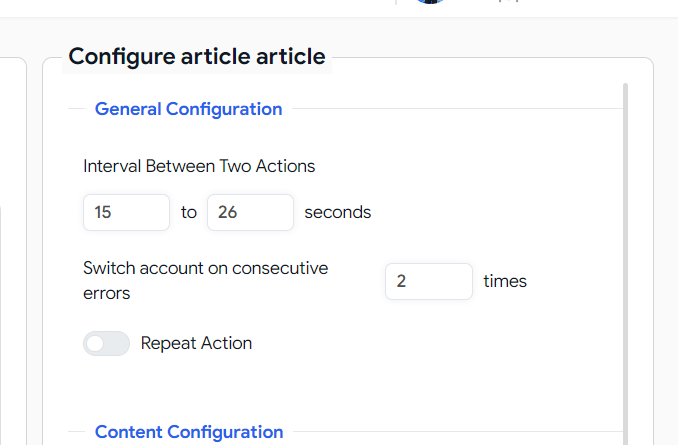
Target Commenting Options:
-
Profile: Comment on posts from the personal timeline of selected accounts.
-
Joined Groups: Comment on posts in groups that the account has already joined.
-
Group ID: Input a specific Group ID to comment on posts within that group.
-
Post ID: Input a specific Post ID to comment directly under that post.
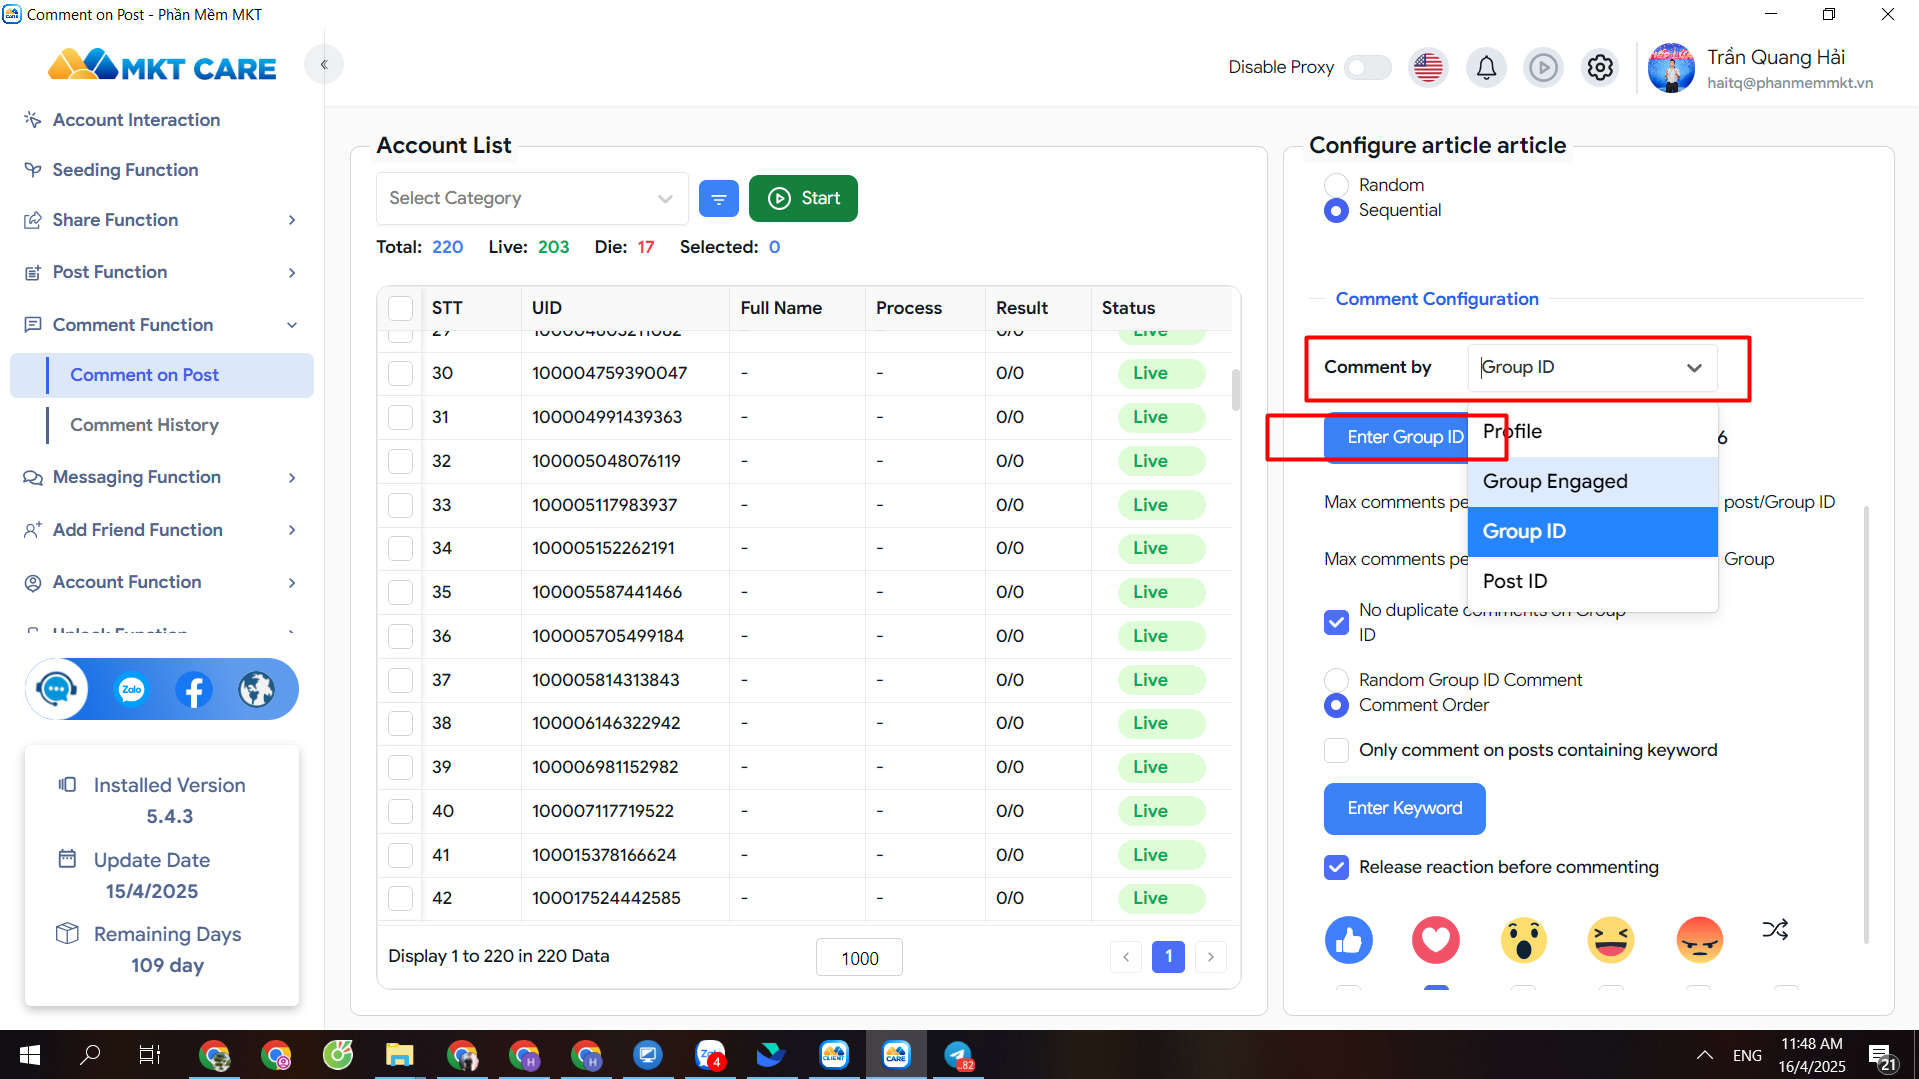
Content Settings:
-
Use Existing Content: Select from pre-written comments stored in the system.
-
Use AI to Generate Content: Let the system use AI to generate automatic comments.
-
Comment Order: Configure the sequence of comments—either random or in a specific order.
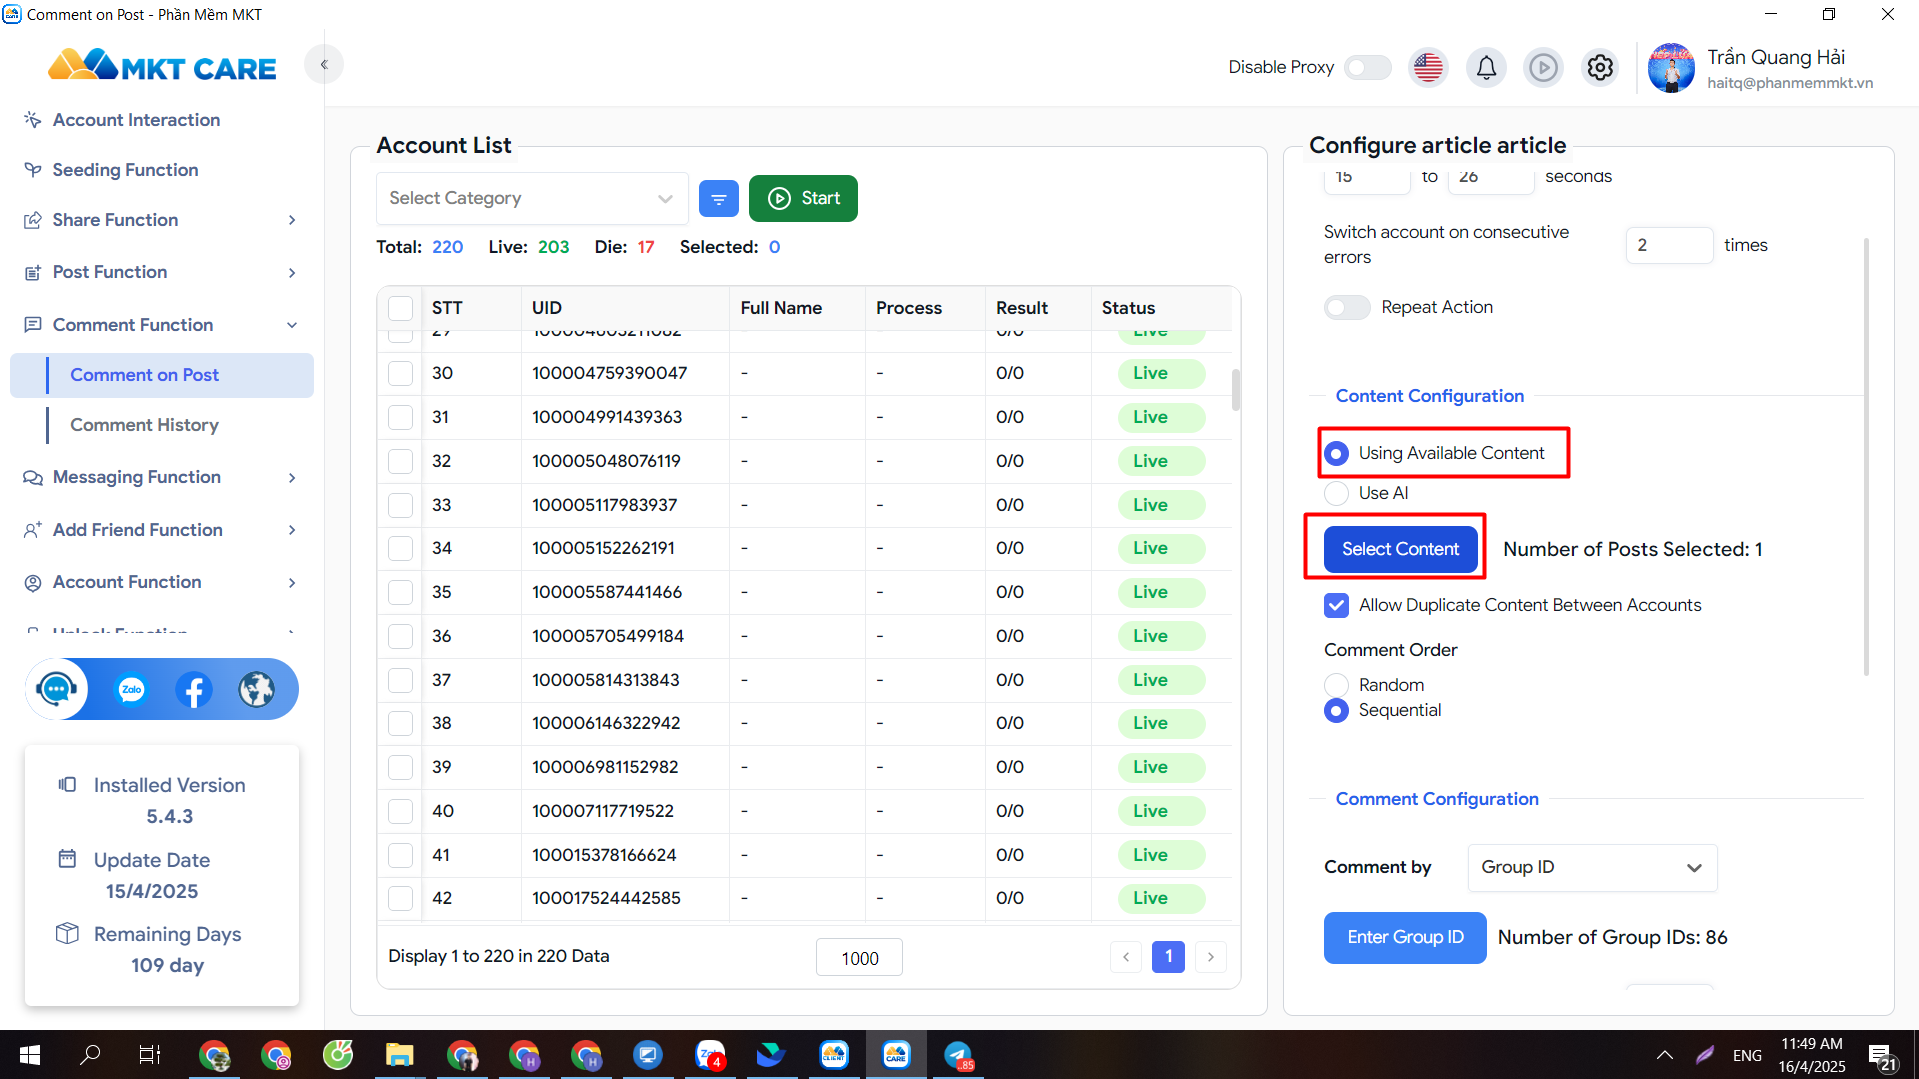
Additional Settings:
-
React to Post: Choose to automatically add a reaction (like, love, etc.) to the post when commenting.
-
Only Comment on Posts Containing Keywords: Set up keyword filters so comments are only made under posts that contain specified keywords.
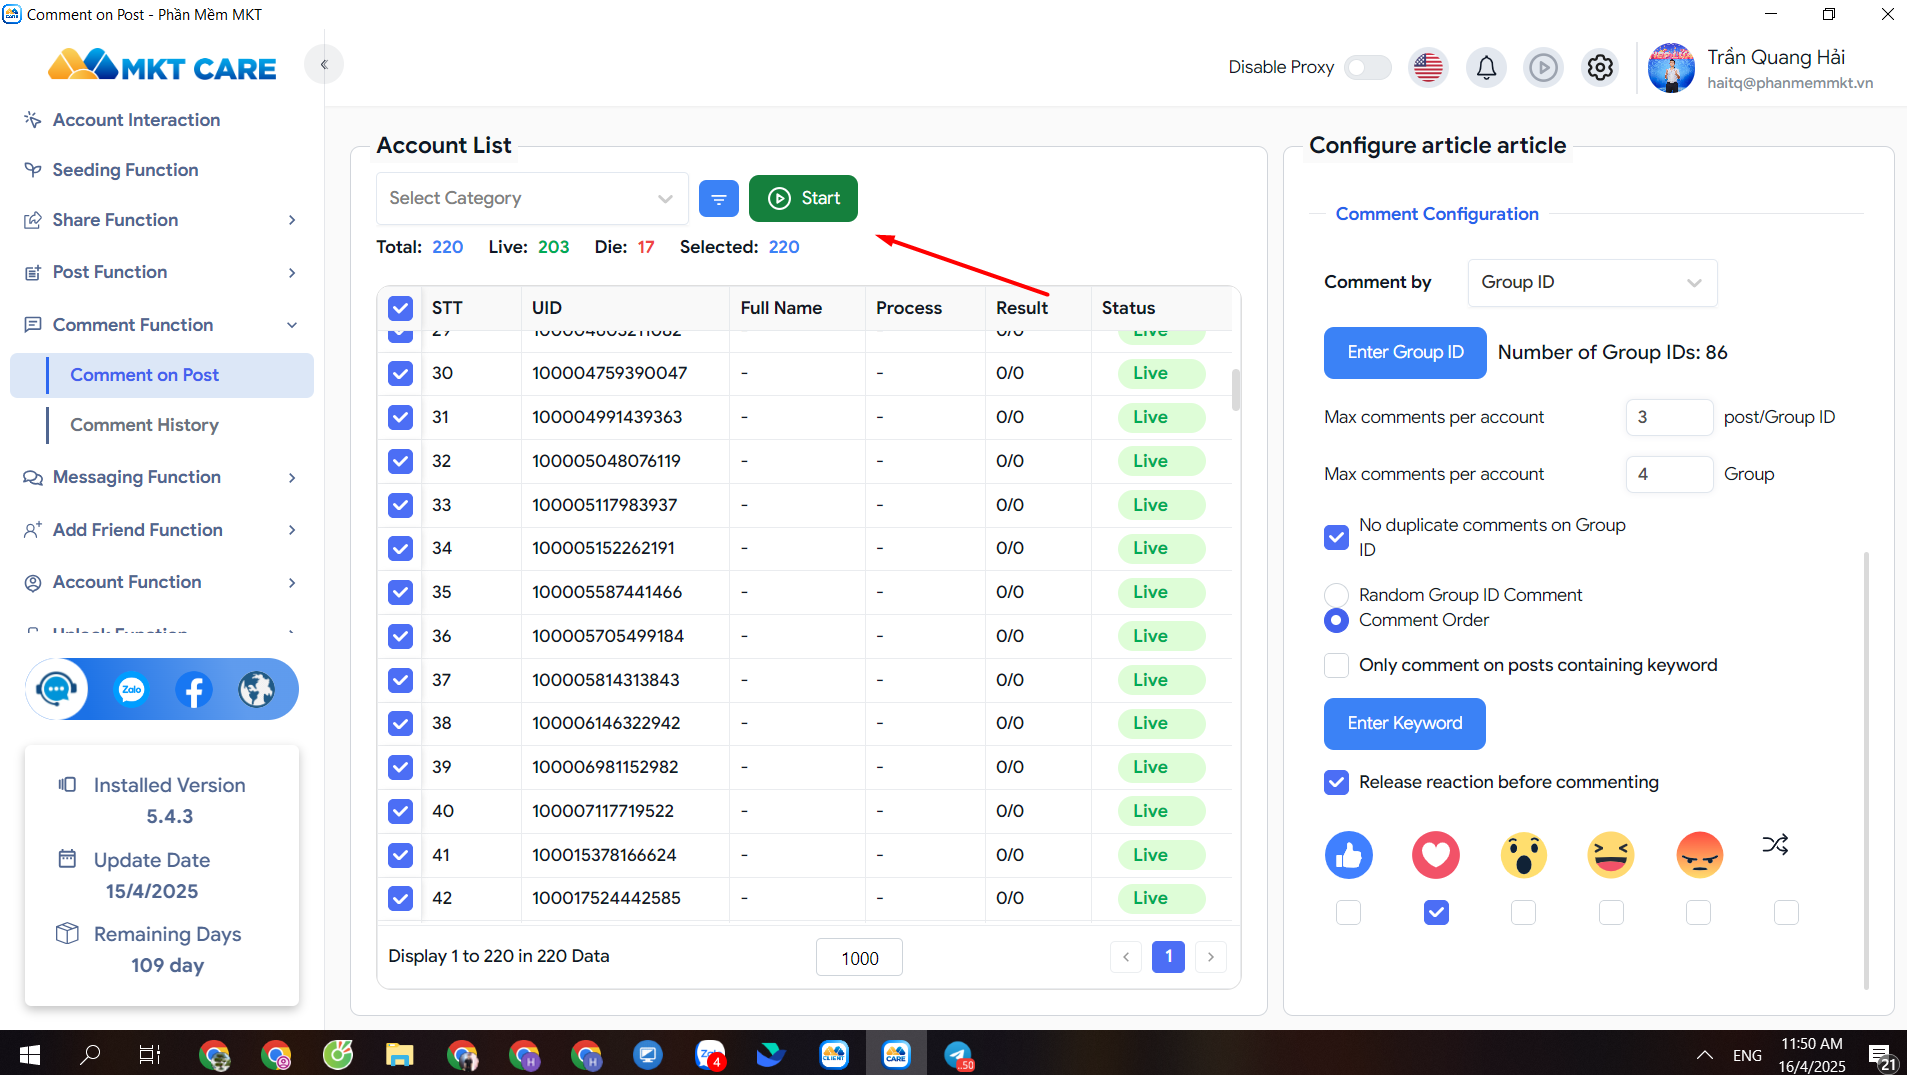
🔹 Step 3: Launch the Program
After completing all configuration steps, review your settings to ensure accuracy.
Click Start to begin the automated commenting process.
The system will proceed to post comments based on the configurations you’ve set.
If you’re looking for a powerful and flexible automation solution to boost your social media marketing performance, MKT software is the perfect tool. With the ability to manage multiple accounts, automate posting, interactions, seeding, and customer care, MKT helps you save time, reduce costs, and achieve better results.
Feel free to contact me today for consultation and deployment tailored to your business needs.
I’m here to support you from start to finish on your journey to smart automation and growth.
- Hotline: ADMIN : QUANG HẢI MKT : + 8439.2426.840
- Youtube : Quang Hai Software – Hai Tools Marketing
- Whatsapp : (+84) 39 2426840 – Quang Hải MKT
- Telegram : @tquanghaimkt
- Fanpage : mkt auto software